

How to Back Up and Restore Windows 10/11: Complete Guide
Losing years of photos, work files, or a properly configured PC to a single hard drive failure is one of those things that only feels avoidable until it happens to you.
The frustrating part is that Windows actually gives you several solid ways to prevent it. Most people just don’t know where to find them anymore, especially since Microsoft has quietly rearranged and renamed its backup tools more than once over the past few years.
This guide covers every backup and restore method that actually works on a modern Windows PC in 2026, whether you’re still running Windows 10 or have moved to Windows 11.
We’ll walk through manual file backups, File History, the old-but-still-functional “Backup and Restore (Windows 7)” tool, full system image backups, and Microsoft’s newer cloud-based Windows Backup app, plus how to restore from each one when things go wrong.
One important thing to know: Windows 10 reached the end of regular support on October 14, 2025. If you still use Windows 10, regular security updates are no longer available. You can continue receiving security updates only if you are enrolled in Microsoft’s Extended Security Updates (ESU) programme.
This makes regular backups even more important. It is also a good time to check whether your PC supports Windows 11. If it does, consider upgrading to Windows 11 for better security and continued support.
Quick Answer: Which Backup Method Should You Use?
For most people, the simplest and most reliable approach in 2026 is a combination of two things: the Windows Backup app (which syncs your files, settings, and installed apps to OneDrive) for everyday protection, and a full system image via the legacy Backup and Restore (Windows 7) tool for disaster recovery, since it’s still the only built-in option that can restore your entire PC ( operating system, apps, and all ) in one shot.
If you just need to protect specific folders without touching the cloud, File History to an external drive remains a solid, private, no-subscription option.
Understand Backup Options in Windows 10 and 11
Windows currently offers four distinct ways to protect your data, and each one does a different job. Confusing them is the single biggest mistake people make when setting up backups.
| Method | What It Backs Up | Where It Saves | Best For |
|---|---|---|---|
| Manual file copy | Individual files/folders you choose | External drive, USB, network share | Quick one-off backups before a reinstall |
| File History | Selected libraries and folders, with version history | External drive or network location | Ongoing protection of personal files |
| Backup and Restore (Windows 7) | Selected files on a schedule, plus full system images | External drive or network location | Complete disaster recovery, including OS and apps |
| Windows Backup app | Files, installed apps, settings, saved Wi-Fi and credentials | OneDrive (cloud) | Moving to a new PC or restoring after a reset |
It’s worth being clear about something Microsoft doesn’t advertise loudly: the legacy Backup and Restore (Windows 7) tool is officially deprecated. Microsoft hasn’t actively developed it in years and has said it could be removed in a future release.
That said, as of 2026 it’s still present in both Windows 10 and Windows 11, and it remains the only built-in tool capable of creating a true full-disk system image; something neither File History nor the newer Windows Backup app can do.
Related: First 10 Things to Do After Installing Windows
Method 1: Manually Back Up Specific Files
The simplest option, and a good one to know for one-off situations like before a clean install.
- Connect an external drive or navigate to your network storage location.
- Open File Explorer and locate the files or folders you want to protect.
- Copy and paste them onto the external drive or network share.
This works, but it’s entirely manual. There’s no automation, versioning, or protection against forgetting to do it regularly. Treat it as a stopgap, not your primary backup strategy.
A good 1TB or 2TB portable external hard drive (find on Amazon) is genuinely the cheapest insurance policy you can buy for your files. It is worth keeping one dedicated purely to backups rather than general file transfers.
Method 2: Back Up Using File History
File History quietly keeps versions of your files over time, so you can roll back to an earlier version, not just recover a deleted file.
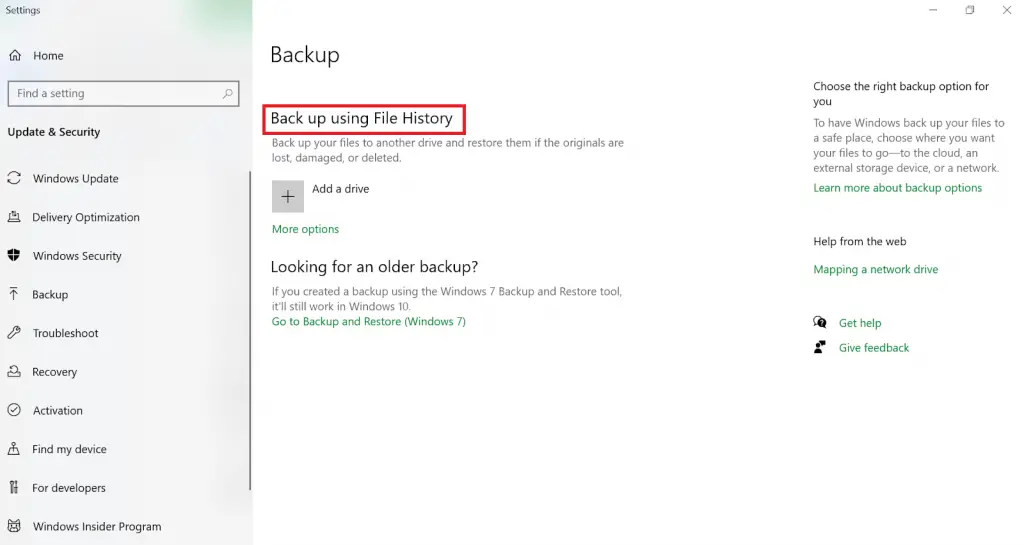
- Connect an external drive, or make sure your network location is accessible.
- Search for File History in the Start menu and open it (in Windows 11, this may route you into Settings under Accounts → Windows Backup, depending on your build).
- Select the drive you want to use for backups.
- Choose which folders to include. By default, this covers your standard libraries like Documents, Pictures, and Desktop.
- Turn the feature on. Windows will now back up changed files automatically at regular intervals.
To restore files later, search Restore your files with File History, browse through the version history, and select Restore to bring back the version you need.
Method 3: Full System Image Backup Using Backup and Restore (Windows 7)
This is the tool to use if you want to protect everything. Not just your files, but your installed programs, system settings, and Windows itself, in a single restorable snapshot. It’s especially useful before major hardware changes, like replacing a hard drive.
How to Create a System Image Backup
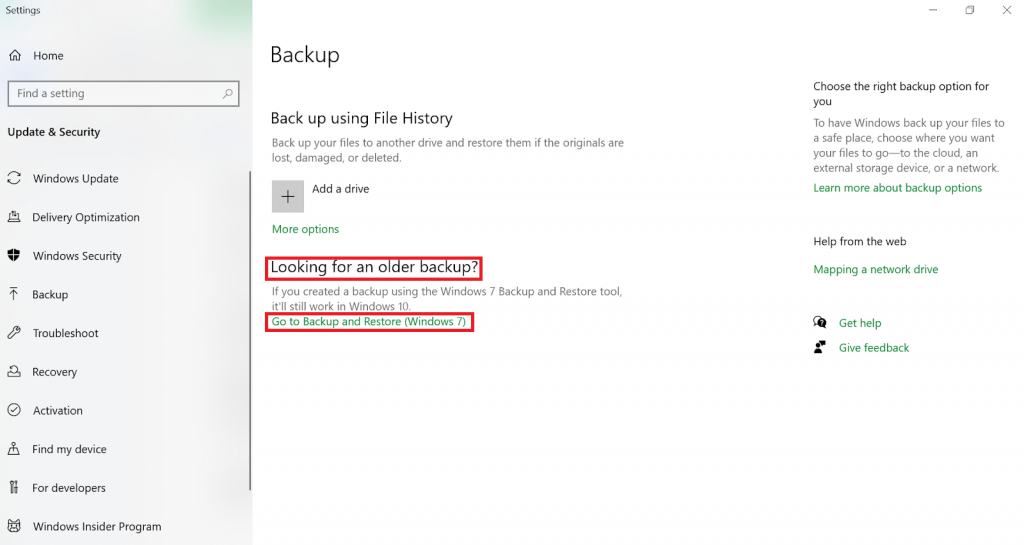
- Open Control Panel (search for it directly; this tool isn’t in the main Settings app on either Windows 10 or Windows 11).
- Go to System and Security.
- Select Backup and Restore (Windows 7).
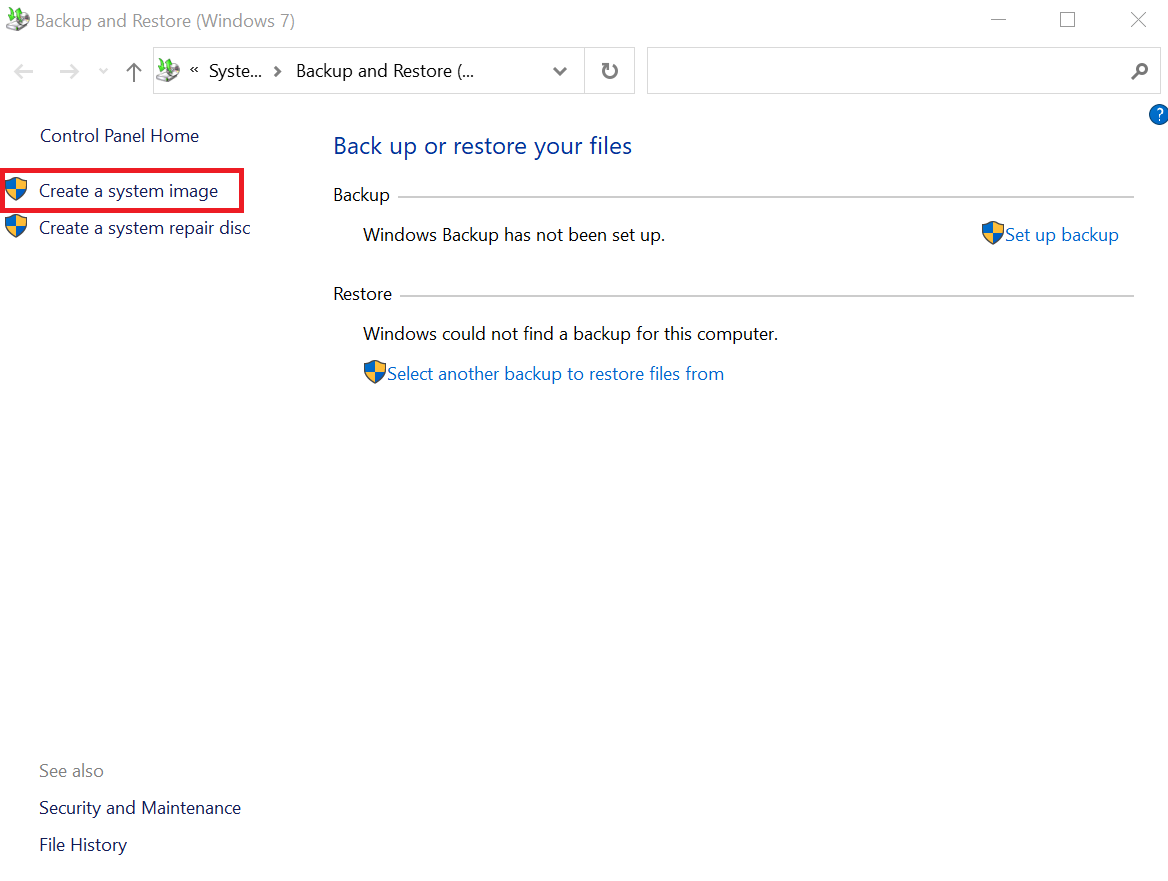
- In the left pane, click Create a system image.
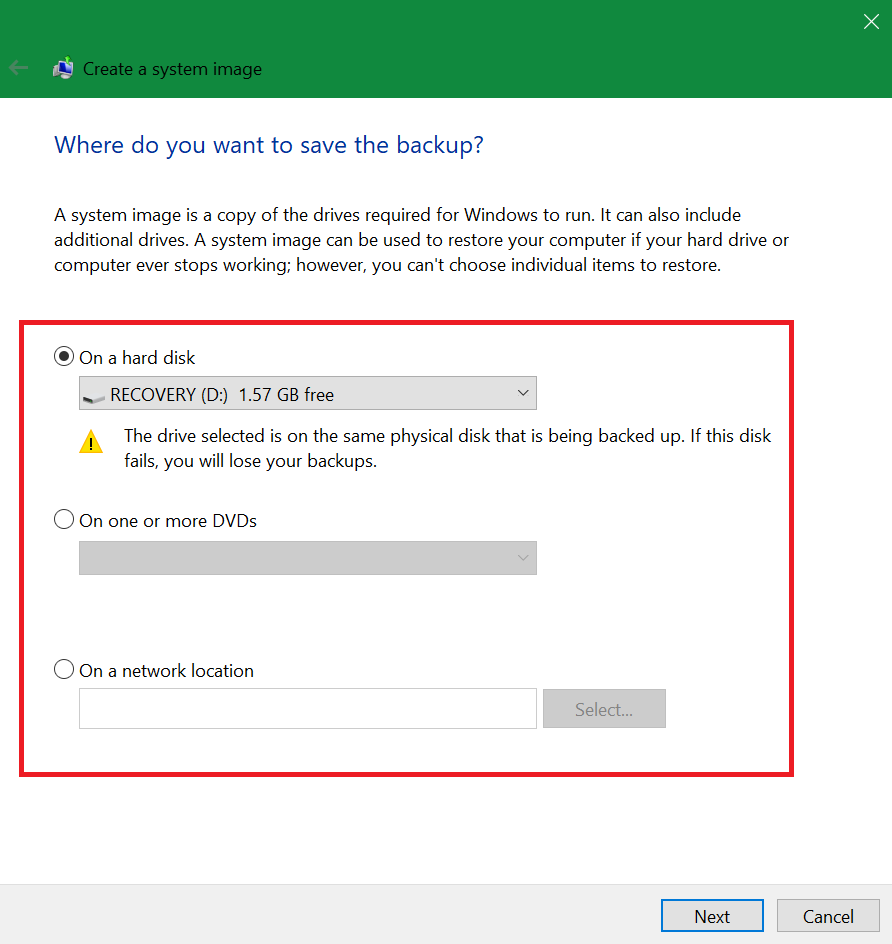
- Choose your backup destination. Ideally, an external drive rather than your system disk, since a system-disk backup won’t help you if that same drive fails.
- Click Next, confirm any additional drives to include, then click Next again and select Start backup.
- When prompted, consider creating a system repair disc or a bootable USB recovery drive if you don’t already have Windows installation media. This is essential, since you’ll need it to boot into recovery if your PC won’t start.
Because this tool doesn’t support scheduling for image backups specifically, make a habit of running it manually every one to three months, and always right before major Windows updates or hardware changes.
Related: A Deep Dive into Disk Format Tools for Windows
How to Restore From a System Image
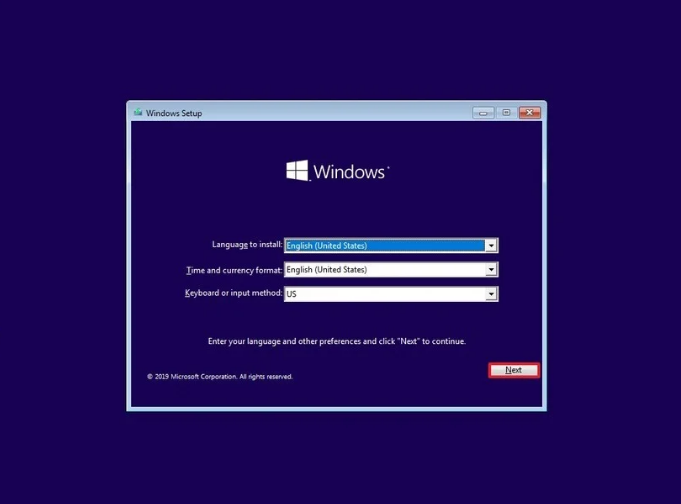
- Shut down your PC and connect the external drive containing your system image.
- Insert your bootable USB recovery drive and boot from it. On most PCs, you may need to enter the boot menu (commonly F12, F10, or Esc during startup) to select the USB drive.
- On the Windows Setup screen, click Next, then select Repair your computer at the bottom.
- Choose Troubleshoot, then Advanced options, then System Image Recovery. On some builds, you may first see a “See more recovery options” screen.
- Select the target operating system, then choose the most recent system image if multiple copies exist.
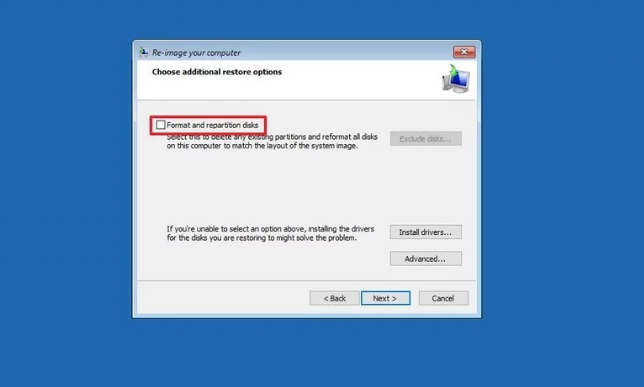
- Optionally choose Format and repartition disks only if you’re restoring onto a brand-new hard drive.
- Click Next, then Finish, and let the restore run without interrupting it. Doing so can leave your system unbootable.
Restore time depends heavily on the image size and your hardware, so budget more time than you’d expect, especially on older drives.
Related: How to Install Windows 11 From a USB Drive: Complete Guide
Method 4: Set Up Automatic Scheduled Backups (Legacy Tool)
If you’d rather not remember to back up manually, the legacy tool also supports scheduled file backups (separate from full system images).
- Open Control Panel → System and Security → Backup and Restore (Windows 7).
- Click Set up backup.
- Select your destination drive and click Next.
- Choose Let me choose, then select the specific folders and files you want backed up.
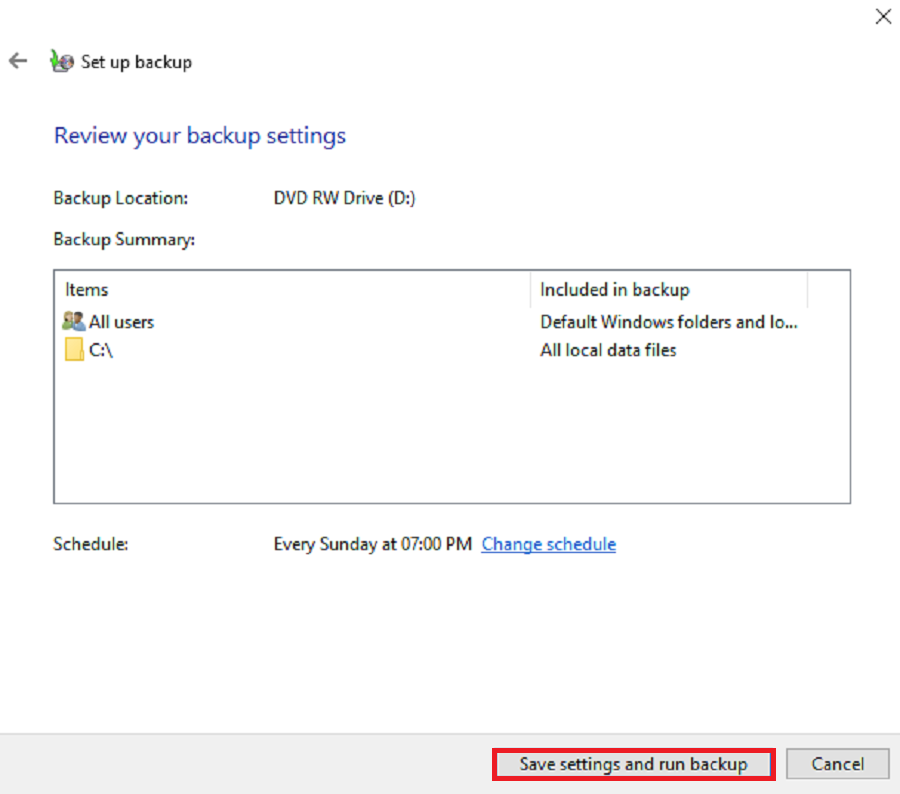
- Review your backup schedule on the summary screen. Windows sets a sensible default, but you can adjust the frequency.
- Click Save settings and run backup. Future backups will run automatically and incrementally on the schedule you set.
Restoring From a Scheduled Backup
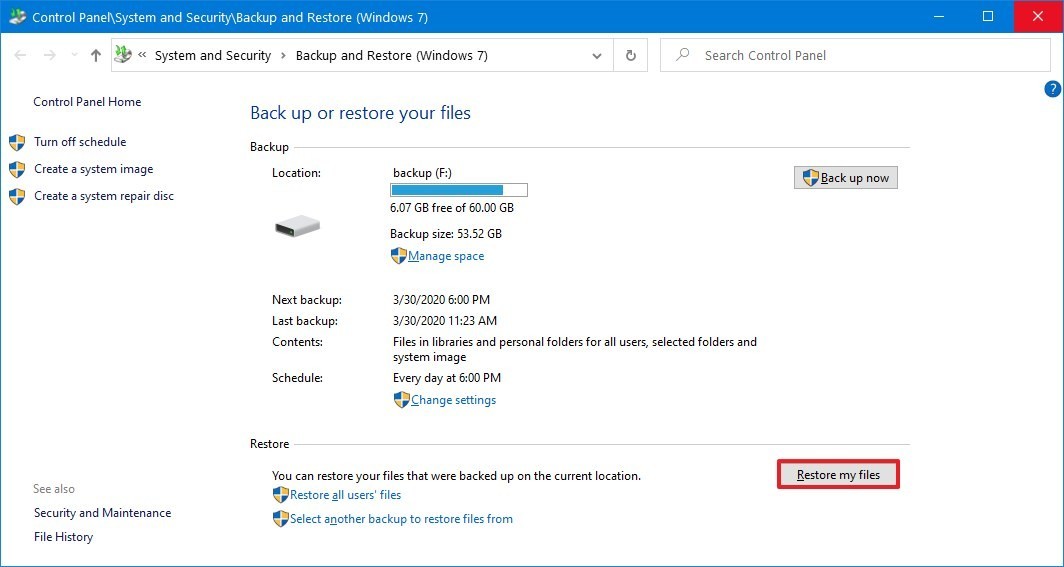
- Open Control Panel → System and Security → Backup and Restore (Windows 7).
- Click Restore my files.
- Click Browse for files (or Browse for folders), select what you need, and click Add.
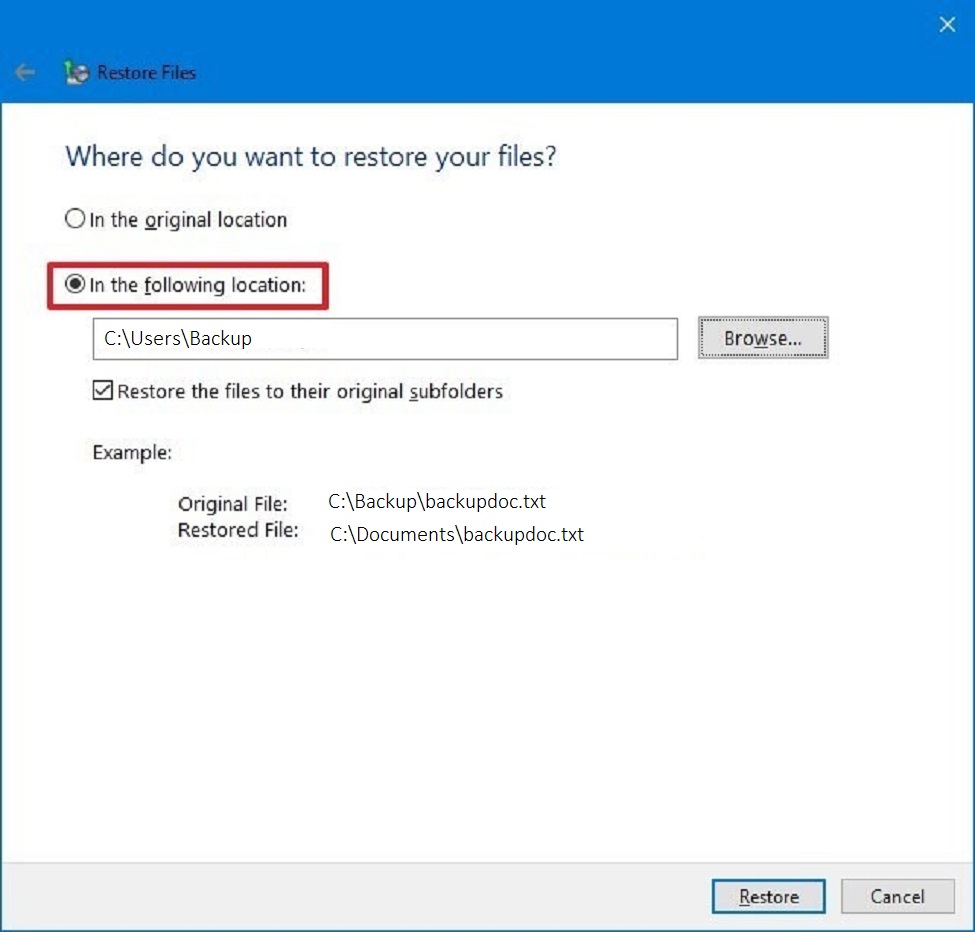
- Choose where to restore the files, either their original location or a new one.
- Click Restore, then Finish.
Method 5: The Windows Backup App (Cloud-Based, Windows 11)
This is Microsoft’s current-generation backup tool, and it works differently from everything above. Instead of an external drive, it saves to your OneDrive account.
- Open the Windows Backup app from the Start menu, or go to Settings → Accounts → Windows Backup.
- Sign in with your Microsoft account if you haven’t already.
- Under Folders, toggle on the folders you want synced to OneDrive; typically Desktop, Documents, Pictures, Videos, and Music.
- Turn on Remember my apps to have your installed Microsoft Store and many desktop apps automatically reinstalled on a new PC.
- Turn on Remember my preferences to back up personalisation, language, accessibility, and account settings.
- Click Start backup (or confirm sync settings) to begin.
Something to be aware of: starting with Windows 11 version 26H2, Microsoft made Windows settings backup on by default for most regions outside the EU, where regulatory requirements keep it opt-in.
If you’d rather control this manually, go to Settings → Accounts → Windows Backup → Manage sync settings and adjust the toggles yourself.
This tool is convenient, but it’s cloud-dependent. You’ll need enough free OneDrive storage, and it does not create a full offline system image the way the legacy tool does. Think of it as complementary to a system image backup, not a replacement for one.
Related: How to Recover Shift-Deleted Files in Windows 10/11
System Image Backup vs. File History vs. Windows Backup: Which Should You Actually Use?
| System Image (Legacy) | File History | Windows Backup App | |
|---|---|---|---|
| Backs up entire OS + apps | Yes | No | Partially (reinstalls apps, not settings-in-place) |
| Works offline / no cloud needed | Yes | Yes | No, requires OneDrive |
| Automatic scheduling | Files only, not images | Yes | Yes |
| Restores individual file versions | No | Yes | Limited |
| Ideal use case | Full disaster recovery | Ongoing personal file protection | New PC setup/device migration |
In practice, most careful users end up running two of these in parallel: a system image every couple of months for full disaster recovery, and either File History or the Windows Backup app running continuously for day-to-day file protection.
Common Mistakes to Avoid
- Backing up to the same physical drive as your system. If that drive fails, you lose the backup along with the original data.
- Assuming File History or Windows Backup covers everything. Neither creates a bootable system image; you’ll still need the legacy tool or third-party imaging software for that.
- Never testing your restore process. A backup you’ve never tried restoring from is a backup you can’t fully trust. Do a test restore of a non-critical file periodically.
- Skipping the recovery media step. Without a bootable USB or system repair disc, a system image backup is far harder to restore from if your PC won’t boot at all.
- Interrupting a restore in progress. Powering off or disconnecting a drive mid-restore can leave your system in an unusable, unbootable state.
- Relying only on cloud backup with no local copy, or vice versa. Each has different failure modes. A fire or theft takes out local drives, while account issues or connectivity problems can affect cloud backups.
Myth vs Fact
Myth: The legacy “Backup and Restore (Windows 7)” tool has been removed from Windows 11. Fact: It’s still present in both Windows 10 and Windows 11, accessible through Control Panel, and remains the only built-in method for creating a complete system image. Microsoft has deprecated it but hasn’t removed it.
Myth: OneDrive backup through the Windows Backup app is the same as a full system backup. Fact: It backs up your files, remembers your installed apps, and saves your settings and credentials. But it does not create a restorable image of the operating system itself.
Myth: You need third-party software to back up a Windows PC properly. Fact: Between File History, the legacy system image tool, and the Windows Backup app, Windows covers most common backup needs natively. Third-party tools add convenience and features like incremental imaging schedules, but they aren’t strictly required.
Frequently Asked Questions
Yes. It’s accessible via Control Panel → System and Security → Backup and Restore (Windows 7), though Microsoft has deprecated it, and it isn’t part of the modern Settings app.
A system image captures your entire drive ( Windows, installed programs, settings, and files) as a single restorable snapshot. A regular file backup only saves the specific files and folders you select.
Generally no. System images created with the legacy Windows tool are designed to restore to the same PC or very similar hardware, not to a different computer.
As of Windows 11 version 26H2, settings backup is on by default for most users outside the EU when signed in with a Microsoft account, though full file backup via OneDrive still needs to be set up or confirmed.
Every one to three months is a reasonable baseline, plus an extra one before major Windows updates or hardware changes like replacing your hard drive.
You’ll have a much harder time restoring a system image if your PC fails to boot, since you need bootable media to access the System Image Recovery tool.
Yes, and it’s actually a recommended combination. File History handles day-to-day file protection, while a system image covers full disaster recovery.
No, but you do need enough free OneDrive storage for your files. Microsoft accounts include some free OneDrive storage by default, though it may not be enough for large photo or video libraries.
Windows 10 reached the end of free support on October 14, 2025. The legacy Backup and Restore tool itself should still be present unless your PC has moved to Extended Security Updates configurations that alter default apps. Check Control Panel directly rather than Settings.
Not directly through the standard restore wizard, which restores the entire image. For individual files, File History or a manual file backup is the better tool.
NTFS is the safest choice for compatibility with the Windows Recovery Environment. Some users have reported issues with exFAT-formatted drives when restoring system images.
If the backup drive stays connected to an infected PC, yes, it can be affected too. Disconnecting external backup drives when not actively backing up reduces this risk, and OneDrive-based backups include some built-in ransomware detection support through Windows Security.
The tool will show a completion notification, and you can verify by checking the destination drive for a folder named WindowsImageBackup. Avoid renaming or rearranging files inside this folder.
The legacy tool can overwrite existing images in the same location. If you want to keep multiple versions, copy each completed WindowsImageBackup folder to a separate location before running another backup.
It’s safer to let a backup complete before shutting down. Interrupting an image creation process, in particular, can result in a corrupted, unusable backup.
Let us conclude that we have covered almost all the basic steps to be followed in Windows 10/11 backup and restore features in Windows 10/11. We welcome hearing your thoughts on the subject.
Hope this article about how to configure backup and restore in Windows 10 /11 is helpful for you. Stay updated about our new articles by following our Facebook and Twitter pages.
Also, don’t forget to share the same with your relatives and friends.
Also, subscribe to our free newsletter so that you will get regular updates directly in your Email.
Subscribe to be the first to learn about new information
Disclosure: If you follow our links to a retailer’s website and make a purchase, we will get an affiliate commission on some, but not all, of the items or services we promote. This will cause no price change for you.