How to Fix the ” Windows could not automatically detect this network’s proxy settings ” Error?
On your PC, are you getting the error “Windows could not automatically detect this network’s proxy settings”?
Here are the steps to resolving the issue.
Before going through the solution process, let us understand what a proxy server is and how it works.
Although this troubleshooting tutorial focuses on Windows 10, it can also be applied to Windows 11.
What Is a Proxy Server, and How Does It Work?
A proxy server, in short, acts as an intermediate link between your computer and the internet. Instead of connecting to the Internet directly, you connect to the proxy server, which retrieves information from the Internet on your behalf.
These are most often used by system administrators in businesses and schools for security and effectiveness.
Unless you explicitly set one up, you’re unlikely to use a proxy server on your home network. This is why, if you encounter this problem, you should clear any proxy settings that may exist.
While you try to resolve this proxy setting problem, we don’t want to bore you with the details. However, it’s helpful to know the fundamentals of what a proxy is and why Windows may have issues with it.
If you have any remaining doubts about the proxy server, watch the video below.
How to Fix the Proxy Server Error?
Every operating system has some kind of issue, and Windows 10 or 11 is no exception. Aside from that, a small number of Windows 10 users have reported proxy concerns.
You may have received the following message after running Windows troubleshoot for a network error :
Windows could not automatically detect this network’s proxy settings.
What does this mean, and how do you go about addressing it?
Let’s look at the proxy settings in Windows and how to fix them.
If you’re having similar issues, take a look at the solutions we’ve provided below. There are a variety of proxy-related problems that can arise, and we’ll go over the following ones in this article:
In any case, let’s look at the solutions mentioned below to see how to correct the ” Unable to connect to the proxy server ” problem. The first thing you can do is reset your Internet options.
1. Restart Your Network Adapter
Restarting your network adapter is one of the easiest ways to solve the Windows inability to automatically detect the network’s proxy settings error.
The problem should be solved by restarting your network adapter, and your network connection should resume working.
Keep in mind that this isn’t a long-term fix, so you’ll have to try it again if the problem reappears. Open Network and Internet Settings by right-clicking the network icon in the bottom right corner.
From the opened window, see the navigation menu in Advanced network settings and choose Change adapter options.
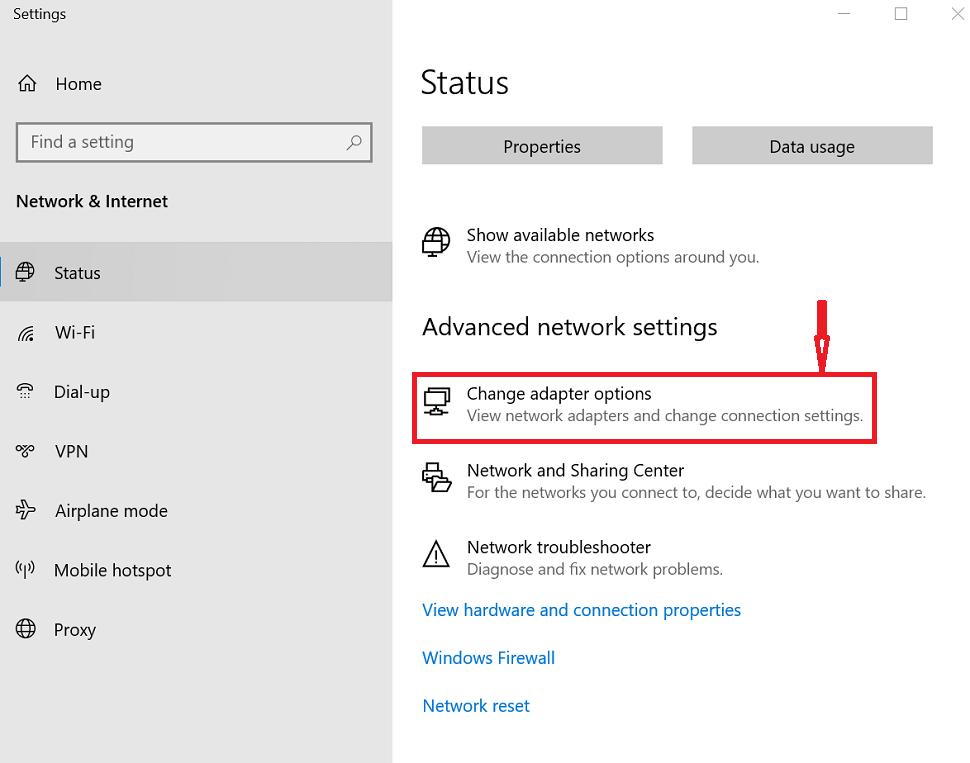
Locate your network connection, right-click it, and select Disable from the menu that appears. Now right-click your network connection and select Enable from the menu that appears.
2. Restart Your Computer as Well as Your Router
It’s always a good thing to restart your machines before diving into advanced troubleshooting.
There’s a probability that this will solve your problem in a matter of seconds. As hardcore Windows users, we know that the majority of Windows problems can be solved by restarting our PC.
Restarting your router is unlikely to help because this error is typically caused by misconfigured settings on a computer. Let us try restarting the router as a preliminary attempt if you’re having network problems of any sort.
If the problem persists after rebooting your machine and router, continue with the next step detailed below.
3. Check Your Windows Proxy Settings
In most cases, this problem is associated with your Windows proxy settings; it’s a good place to start.
To get to your proxy settings in Windows 10, go to Settings, then Network & Internet, then the Proxy tab on the left sidebar.
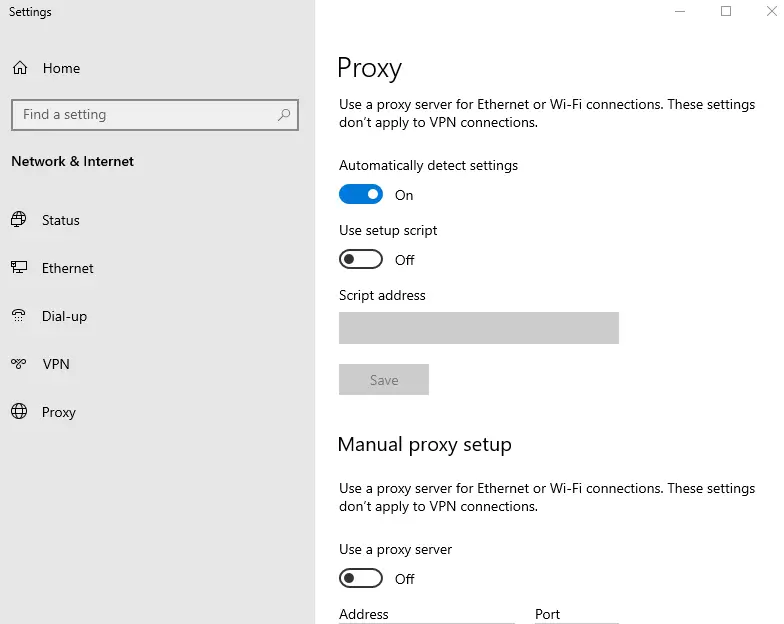
You’ll find a list of options for proxy servers here. If you don’t use a proxy (as most home users do), make sure Use a proxy server is switched off near the bottom. If it’s still on, leave the Automatically Detect settings on.
Users who interact via a proxy, such as those in a company or school setting, should check with their system administrator to ensure they have the correct proxy information.
After that, reconnect to the network once more. If the error persists, disable the Automatically detect settings in the proxy options and try again.
4. Antivirus, VPN, and Firewall Software Are All Worth Having a Look at
Next, check to see if your network connection is being hampered by a firewall, VPN, or security suite. Perhaps you installed a new app that changed proxy settings for some reason, or your preferred software received an update that altered an option you weren’t aware of.
Disable your firewall, VPN, and antivirus software one by one to see if the error disappears. If it does, one of those apps is the source of the problem.
To avoid interfering with regular network activity, you’ll need to configure them.
5. Uninstall Your Antivirus Software
Using your computer without an antivirus is not a good idea, because Windows 10 includes Windows Defender, which will protect you even if you delete your antivirus software.
According to some users, antivirus software such as Norton and AVG will cause proxy problems on Windows 10, so it’s best to uninstall your current antivirus software.
Check if the problem has been solved after deleting your antivirus software. If the problem is fixed, make sure you download and install new antivirus software.
We recommend using genuine antivirus software. Effective and inexpensive antivirus solutions like Bitdefender and Kaspersky are available on Amazon.
6. Use the Network Adapter Troubleshooter to Troubleshoot Your Network Adapter
The Internet Connections troubleshooter is launched when you right-click on the network connection icon in your System Tray and choose to troubleshoot.
If your problem is not solved, there is another network troubleshooter you can use that may be more helpful.
Move to Settings and go to Update & Security > Troubleshoot.
Select Network Adapter from the list of additional troubleshooters, then walk through the troubleshooter.
These troubleshooters don’t always solve your problem, so they’re nice to have options, as seasoned Windows users know.
7. Obtain IP Address and DNS Information Automatically
There aren’t many troubleshooting steps unique to proxy servers, as it turns out.
We’ll go over some more tips below, but keep in mind that from here on out, the troubleshooting will look a lot like repairing the “No Internet Access” Windows error.
This error can also be caused by a misconfigured IP address or DNS settings, which aren’t technically linked to your proxy settings.
Go to Settings > Network & Internet > Status to see what’s going on.
To see all of your network connections, click the Change adapter options button in the list, then double-click the one you’re using.
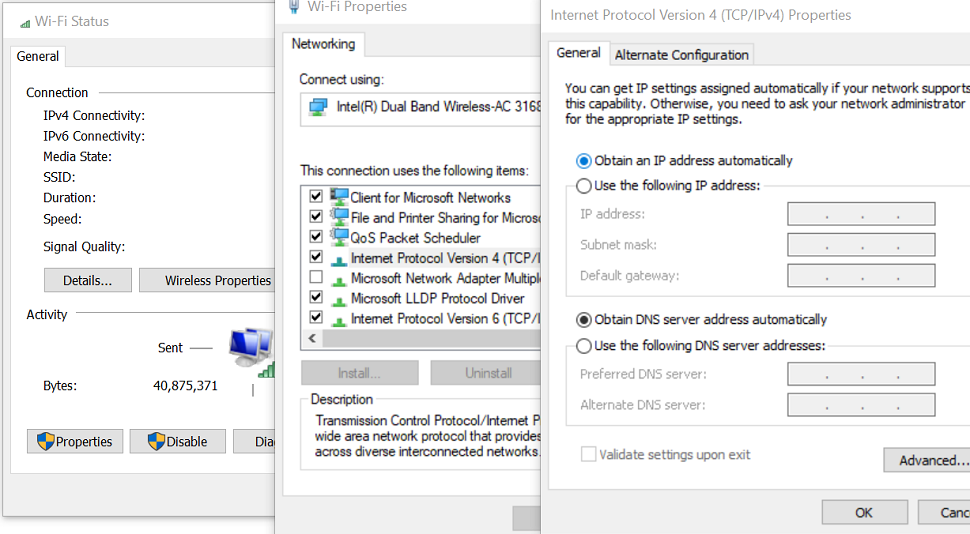
Double-click Internet Protocol Version 4 in the list after clicking the Properties button.
Make sure that both Obtain an IP address and Obtain DNS server address automatically are checked. You would be unable to connect to the internet if the settings are incorrect.
8. Your Network Driver Should Be Updated or Rolled Back
Connection issues may be caused by an obsolete network driver.
Similarly, you may have recently installed a faulty network driver update. In either case, replacing the driver may be sufficient to resolve the proxy message problem.
To access Device Manager, right-click on the Start button and choose Device Manager. Double-click the connection you’re using in the Network Adapters section.
Then, on the Driver tab, select Roll Back Driver to remove the most recent update and revert to the earlier version.
If you’re having problems after updating, try this. It might not work in all cases.
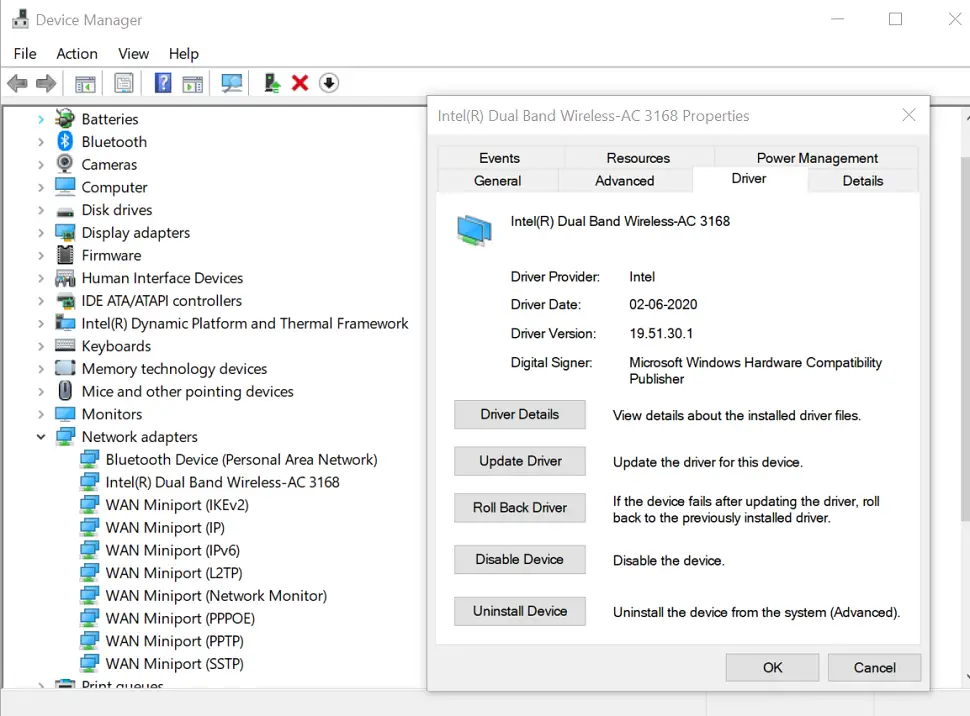
Choose Update Driver to see if there are any new updates available over the internet.
However, if this fails to detect anything, you’ll have to manually update your drivers by downloading them from the manufacturer’s website.
9. Using the Command Prompt, Reset the Network Configuration
The Command Prompt in Windows provides several network troubleshooting tools. A few simple commands will sometimes solve your problem in a matter of seconds.
If you’re still having issues, right-click the Start button and select Open Command Prompt (or PowerShell) with administrator rights.
Then, one by one, run the commands below.
They’ll reset your computer’s network functions, including clearing old connection data and obtaining a new IP address from the router:
netsh int ip reset resetlog.txt
netsh winsock reset
netsh int ip reset
ipconfig /release
ipconfig /renew
ipconfig /flushdns
sfc/scannow
DISM /Online /Cleanup-Image /RestoreHealth
If the problem is not yet solved, restart your PC and check after performing each command.
10. Malware Scanning
Some malware would tamper with your proxy settings indefinitely, preventing you from accessing the internet.
You could be a victim of this if you keep getting the message “Windows could not identify this network’s proxy settings” every time you reboot.
As a result, you can run a scan with a reputable anti-malware program like Malwarebytes.
This will detect and remove any malware that is currently active on your system.
If the scan reveals any infections, follow the steps outlined in the report to see if your connection returns to normal.
11. Make Use of a Restore Point
The System Restore feature in Windows allows you to go back to a time when your machine was in good working order.
If your problems started lately, try this to see if you can go back in time and fix them.
The error message should be fixed after the restoration is completed, and everything should start working again.
Go to Settings > System > About to find it. Click System Protection in the right sidebar (if you don’t see it, widen the Settings window horizontally).
On the System Protection tab of the resulting System Properties dialogue box, click System Restore to open a new window.
Windows will guide you through the process of selecting a restore point and checking the procedure.
Of course, you won’t be able to use this feature if your machine hasn’t created any restore points.
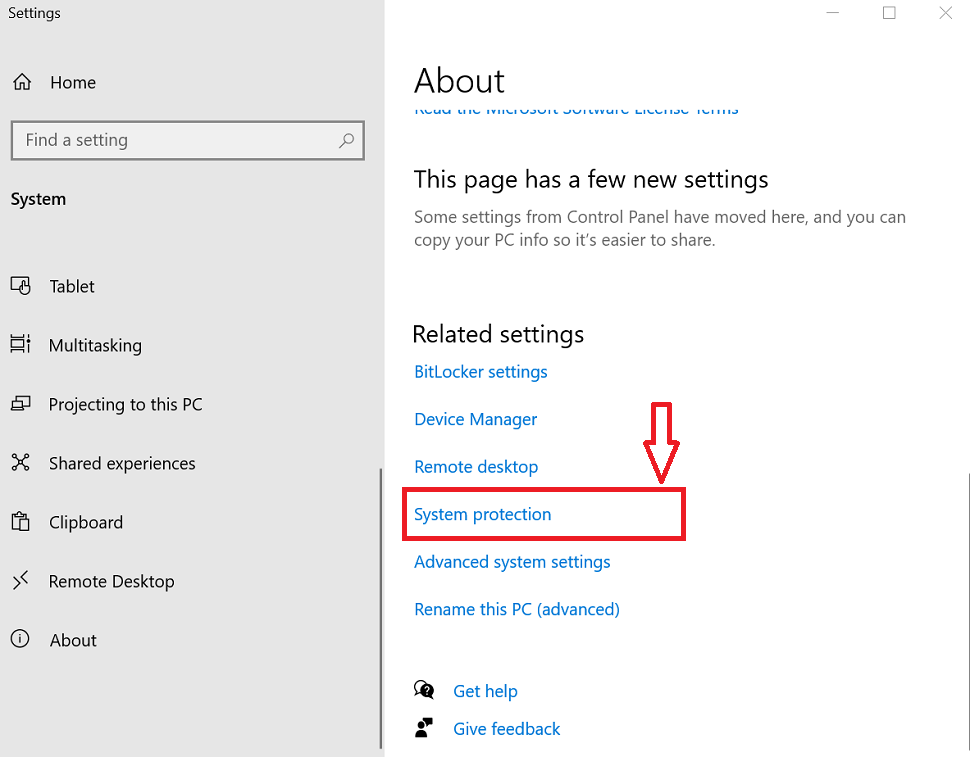
It’s worth noting that using a restore point would uninstall any programs or drivers you’ve installed since the last time you used it without any problem.
To see what impact it will have, click Scan for affected programs on a restore point. Any of your files will be unaffected by a System Restore.
Many people claim that this solution solved their problem, so give it a try.
12. Reset Your Network Configuration
After you’ve tried everything else, you can reset your network configuration in Windows.
You’ve already put in a lot of effort, and a reset can resolve whatever lingering issue is preventing you from connecting with this “Windows could not detect network proxy” error.
Thankfully, Windows 10 makes resetting your entire setup a breeze.
Navigate to Network & Internet in the Settings menu. Find Network reset at the bottom of the Status tab and click it.
Please be warned that this will erase all network information from your computer, requiring you to reconnect to any saved networks.
Click Reset now if you’re okay with it. Your machine will restart after performing the reset.
Conclusion
When Windows fails to detect proxy settings, you know what to do. All network errors are aggravating, so you should be able to resolve this one quickly.
The most important thing is to make sure your proxy is switched off (if you don’t use one) or appropriately configured (if you do use one).
Otherwise, some standard network troubleshooting could get you back online and patched up in no time.
Please share this article with your friends and relatives for their information. Alternatively, follow our Facebook and Twitter pages for instant updates.
Subscribe to our free newsletter so that you will get regular updates directly in your Email.