11 Ways to Resolve the ‘No Internet, Secured’ Error in Windows 10 & 11
In Windows 10, we are experiencing various kinds of network connectivity errors. ‘No Internet, Secured’ is an example of such an issue. Let us try to grasp the problem and find a solution.
What Does the ‘No Internet, Secured’ Error Mean?
The error message indicates that the computer is linked to a secure network but is unable to access the internet.
This error occurs on a Windows 10 machine that is connected to the internet through Wi-Fi. These errors are displayed in the notification panel or as a pop-up in the system tray.
The PC/Laptop is attached to the network during this error state, but you are unable to reach the internet. Changes in network configurations or settings are the most frequent cause of this error.
How to Fix the ‘No Internet, Secured’ Error?
Even if the problem is straightforward to correct, a single direct solution is not feasible. Ever since the source of this error differs from PC to PC.
But, before digging deeper into the problem solution, determine if the fault affects only Windows 10 machines or all devices on your local network.
Let us investigate each case to find a solution.
No Internet in Multiple Devices in the Network
Internet connectivity is not available in all devices connected to the same Wi-Fi network in this situation. In this case, the issue could be with your router or with the access point.
The first thing we can do in this situation is reset the router or access point.
For a minimum of 10 seconds, turn off the router and then turn it back on. If you are using a different access point device that is not built into the router, use the same method of restarting it.
Check to see if your computers are linked to the internet soon after restarting the router/access point. If not, restart the devices and allow them to connect to the network.
No Internet Access in Windows 10 Computer Only
In this scenario, we have internet connections on all our network devices except the Windows 10 machine (s).
We must go through the various solutions described here one by one. We guarantee that in most situations, any of these approaches will work for you.
1. Restart Your Network Connections
This is the first and most common solution to any of your network issues. In the system tray, click the Wi-Fi connection icon.
Tap the Disconnect button next to the linked network in the list. Wait a minute before clicking the Connect button on the same network.
If your internet access issue has not been resolved, proceed to the next step.
2. Restart Your Computer
As you are aware, restarting the computer is the easiest and most convenient approach to the majority of problems with devices operating under any operating system.
As a result, we will use the computer, restarting with this internet connection as well. See whether the problem is solved or not.
Are you all unlucky? Don’t be concerned.
Proceed to the third solution.
3. Bring Your Computer Closer to the Internet Router
The most typical cause of the “No Internet, secured” status is that you are too far from the source of your Wi-Fi connection.
This causes your computer to detect the Wi-Fi network and “connect,” but the signal is too weak to send any data.
Move your computer closer to the internet router, or your router closer to your computer. In general, maintain your home’s internet router in a central place, high off the ground, and away from any items or barriers that may interfere with the signal.
If your home is large enough that one internet router is insufficient to provide a strong signal everywhere, consider purchasing a Wi-Fi extender. This choice will aid in the transmission of a robust Wi-Fi signal across your home.
4. Update Your Network Device Driver
In certain cases, an internet connectivity problem in Windows 10 arises as a result of a problem with the network device’s driver. In this stage, we will attempt to update the network device driver.
As you might know, a driver is a tiny piece of software that allows an attached device to communicate with the operating system. Typically, these programs are created by the hardware manufacturers themselves.
It should be noted that minor flaws in this driver program can impair the regular operation of the device connected to the system.
Pick Device Manager from the menu that appears when you right-click on Start. Then, expand network adaptors. You will see your network device here. Right-click it. Then choose the Update Driver option from the menu.
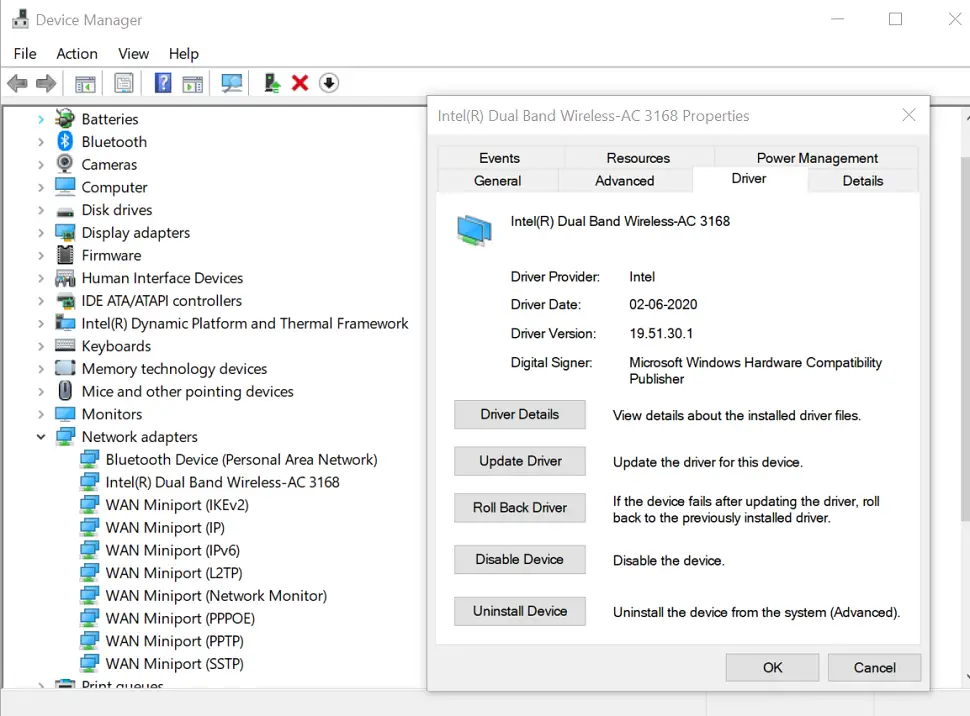
Then wait for some time to update the network device driver. Once the driver is updated, restart your machine, and your internet connection will usually be established.
If the PC is not connected to the internet, follow the previous steps and Disable the network device. Then let your computer reboot and enable this network device.
If your computer fails to connect to the internet, follow the previous steps again till the selection of the network device. Here, right-click on the network device and click on the Uninstall option in the opened menu.
Your network adaptor device will be uninstalled from Windows at this stage. In the Device Manager pane, click Network Adapters again, and then select the Action button at the top of the window.
You’ll see a list of options here, and then press Scan for Hardware Changes. Windows will automatically detect and reinstall the network adaptor.
Restart the computer and see whether the internet connection is available for you.
5. Verify Your Computer Network Connection Properties
In this step, we will verify your Windows PC’s network and internet settings. Simply right-click the Wi-Fi icon in the system tray and choose Open Network & Internet settings.
Then, from the opened window, navigate to the adaptor options. Right-click on your Wi-Fi connection and select Properties. Then, check to see if the following items are checked.
- Client for Microsoft Networks
- File and Printer Sharing for Microsoft Networks
- Internet Protocol Version 4 (TCP/IPv4)
- Internet Protocol Version 6 (TCP/IPv6)
- Link-layer Topology Discovery Responder
- Link-layer topology discovery mapper I/O driver
- Reliable Multicast Protocol
If you have made any changes, restart the computer. If you have an Ethernet connection attached to your PC, you should disconnect it.
6. Enable IPv4 Only
IPv4 is a networking protocol that came before IPv6. Even though IPv6 has many advantages over IPv4, it is more prone to errors.
In our case, try reconnecting the computer using only the IPv4 protocol. Follow the steps in the preceding solution to uncheck Internet Protocol Version 6 (TCP/IPv6).
Confirm your selection and restart your Windows 10 computer.
7. Disable the VPN Connection
Many PCs connected to the internet via a VPN have reported “No Internet, Secured” issues. It could be due to bugs in the VPN software or the VPN server’s inactivity.
If you’re also using a VPN, try disabling it briefly and connecting your PC directly to the internet. If the issue is with the VPN, you can simply connect to the internet directly.
8. Reset Winsock
Winsock is an abbreviation for Windows Socket API, which is the network communication specification for your PC with network services. Another option for resolving the “No Internet, Secured” error is to reset Winsock.
To perform the Winsock reset, run the following command.
netsh winsock reset catalog
The network connection will be automatically reconnected after you execute the command. If it does not reconnect automatically, reconnect the network connection manually.
9. Reset Windows 10 IP Configuration
We are attempting to refresh the IP configuration in this step by requesting a new IP address from the router. To do so, run the following commands in Windows PowerShell.
Right-click Start > Windows PowerShell.Type the following command in the Windows PowerShell window.
ipconfig /release
ipconfig /renew
By running these commands, your PC will be assigned a new IP address and, in most cases, the internet error will be resolved.
10. Clear Your DNS Cache
In this solution, we attempt to erase the DNS cache by running the command below.
Enter the following command into the command prompt:
IPCONFIG /flushdns
In many cases, this will clear your PC’s DNS cache and resolve the internet connection error.
11. Change Your DNS Server
Your Wi-Fi connection’s DNS (Domain Name System) server allows you to connect to websites and other network machines.
The Domain Name System (DNS) is similar to a phonebook on the internet, only it is automated and spans the whole globe.
If your DNS server fails, you will be disconnected from the internet.
In most circumstances, your PC will simply utilise the DNS server provided by your ISP. However, you may manually configure your DNS server to resolve “No Internet” issues.
- Open the Properties window for your connection by following the steps in the 5th solution above.
- To open a new window, double-click the Internet Protocol Version 4 (TCP/IPv4) option.
- On the General tab, choose the option Use the following DNS server addresses.
- Enter the new DNS servers you wish to use. If you’re not sure, use 8.8.8.8 and 8.8.4.4, which are Google’s Public DNS addresses. You may also try the Cloudflare DNS servers 1.1.1.1 and 1.0.0.1.
- To save your changes, click OK.
Conclusion
We guarantee that the ‘No Internet, Secured’ error will be removed at any stage of implementing the aforementioned solution.
We hope you were able to resolve the issue of the no internet secured error. However, as previously stated, the issue could be caused by a problem in the network that is not related to your PC. In this case, check the status of your PC’s connection in a different network.
We hope you are interested in this article and consider following our Facebook, Instagram, and Twitter pages for regular updates.
Subscribe to our free newsletter so that you will get similar articles and regular updates directly in your Email Inbox.
Also, share this article with your friends and relatives.
Subscribe to be the first to learn about new information