

Best Disk Format Tool for Windows: Complete Guide & Comparison
You’ve got a drive that needs formatting, maybe it’s a new external SSD, a USB stick showing up as RAW, or an old hard drive you’re about to hand off to someone else.
You right-click it in File Explorer, hit Format, and then you’re staring at a dropdown asking you to choose between NTFS, FAT32, and exFAT with no idea which one you actually need.
That moment of hesitation is exactly why this guide exists. We’re going to walk through every practical way to format a drive on Windows, the built-in tools you already have, the free third-party software worth installing, and the command-line route for when the graphical tools won’t cooperate.
So you pick the right method the first time instead of guessing.
Quick Answer: Which Formatting Method Should You Use?
- Formatting a drive under 32GB with no issues? Right-click it in File Explorer; it takes 30 seconds.
- Need more format options, or the drive isn’t showing up cleanly? Use Disk Management.
- Drive shows as RAW, is write-protected, or File Explorer refuses to format it? Use DiskPart via Command Prompt.
- Formatting a large drive to FAT32 (Windows caps this at 32GB in the GUI), or want visual partition management? Use a free third-party tool like MiniTool Partition Wizard, EaseUS Partition Master, or AOMEI Partition Assistant.
- Creating a bootable USB drive? Use Rufus, not a standard formatter.
Now let’s go through the details for each situation.
Related: How to Install Windows From a USB Drive? Step-by-Step Guide
What Disk Formatting Actually Does
Formatting builds (or rebuilds) the file system on a drive. The structure your operating system uses to track where every file physically lives on the disk. Without a file system, a drive is just raw storage that Windows can’t read or write to in an organised way.
During formatting, Windows divides the storage into sectors and creates a file allocation table (or equivalent index, depending on the file system) that keeps track of what’s stored where.
This is also why formatting erases existing data, the old index gets wiped, and without it, the operating system has no reliable map to your files anymore, even though traces of the actual data can sometimes still linger physically on the disk until overwritten.
When You Actually Need to Format a Drive
You don’t need to format often, but a few situations genuinely call for it:
Setting up a brand-new drive. New internal drives, external HDDs, and SSDs sometimes arrive unformatted or formatted with a file system that doesn’t suit your use case.
The drive shows up as RAW or “not accessible.” This usually means the file system got corrupted, and a reformat is often the fastest fix (assuming you don’t need the existing data, more on recovering it below).
Switching file systems. Moving a drive between Windows and macOS, or needing a file system that supports larger individual files, often means reformatting to exFAT or NTFS.
Wiping a drive before selling, donating, or recycling it. A full format clears the visible file index, making casual data recovery much harder. For genuinely sensitive data, a dedicated wipe tool that overwrites the disk is more thorough than formatting alone.
Persistent errors or corruption. Frequent crashes tied to one drive, or a partition that won’t mount properly, can sometimes be resolved with a clean reformat after ruling out hardware failure.
Reinstalling Windows on that drive. A fresh OS install is often paired with formatting the target partition to eliminate leftover files and settings from the previous installation.
NTFS vs. FAT32 vs. exFAT: Which File System Should You Pick?
This is the part most guides skip, and it’s usually the actual source of confusion. The dropdown asks you to choose a file system, but doesn’t explain what each one is for.
| File System | Best For | Max File Size | Max Drive Size | Works On |
|---|---|---|---|---|
| NTFS(New Technology File System) | Windows internal drives, external drives used mainly with Windows | 16 EB (effectively unlimited) | 8 PB | Windows natively; Mac (read-only without extra software) |
| FAT32(File Allocation Table 32) | Small USB drives, older devices, game consoles, car stereos | 4GB | 32GB (via Windows GUI); larger with third-party tools | Nearly everything: Windows, Mac, Linux, consoles, cars |
| exFAT(Extended File Allocation Table) | Large external drives and USB sticks shared between Windows and Mac | 16 EB (effectively unlimited) | 128 PB | Windows and Mac natively; most modern Linux distros |
Rule of thumb: if the drive lives inside your Windows PC, use NTFS. If it’s a USB drive under 32GB going into a car stereo, TV, or older device, use FAT32. If it’s a large external drive you move between a Windows PC and a Mac, use exFAT.
Quick Format vs. Full Format: What’s the Real Difference?
Every formatting tool gives you this choice, and it matters more than most people realise.
Quick Format rebuilds the file system’s index without scanning the entire disk surface for damage. It takes seconds to minutes, and it’s fine for a healthy drive with no known issues.
Full Format does everything Quick Format does, plus a full sector-by-sector scan for bad or damaged areas, marking them so the file system avoids storing data there.
It takes considerably longer, anywhere from several minutes to multiple hours, depending on drive size and connection speed. But it’s the safer choice for a drive you suspect has problems, or one you’re preparing for long-term or critical use.
If you’re not sure which to pick: use Full Format for a drive you’re setting up for the first time or one that’s shown any errors, and Quick Format for a healthy drive you’re just clearing out.
Method 1: Format a Drive Using File Explorer (Simplest Option)
This is the fastest route for a straightforward, error-free drive.
- Open File Explorer (Windows key + E).
- Click This PC in the left sidebar.
- Right-click the drive you want to format under Devices and Drives.
- Select Format.
- Choose your file system (NTFS, FAT32, or exFAT) and allocation unit size (the default is fine for most users).
- Optionally, type a volume label to name the drive.
- Tick or untick Quick Format based on the guidance above.
- Click Start, then confirm the warning that all data will be erased.
Limitation to know about: File Explorer’s format dialogue won’t let you format a drive larger than 32GB to FAT32. If you need FAT32 on a bigger drive, skip to the DiskPart or third-party tool sections below.
Method 2: Format a Drive Using Disk Management
Disk Management gives you a bit more control. This is useful when a drive isn’t showing up cleanly in File Explorer, or when you need to work with partitions rather than just the whole drive.
- Right-click the Start button and select Disk Management.
- Locate the drive or partition you want to format in the list.
- Right-click it and select Format.
- Set the volume label, file system, and allocation unit size.
- Choose whether to Perform a Quick Format.
- Click OK, then confirm the data-loss warning.
Disk Management is also where you’d go to initialise a completely new, unpartitioned drive before it can be formatted at all. Right-click the drive at the bottom of the window and select Initialise Disk if it shows as “Not Initialised.”
Method 3: Format a Drive Using DiskPart (Command Prompt)
This is the method to reach for when the graphical tools won’t format the drive, commonly with RAW drives, write-protected drives, or drives that need FAT32 formatting past the 32GB GUI limit.
- Press Windows key + R, type
cmd, and press Ctrl+Shift+Enter to open Command Prompt as Administrator. - Type
diskpartand press Enter. - Type
list diskand press Enter to see all connected drives. - Type
select disk X(replace X with the correct disk number) and press Enter. Double-check this number carefully; selecting the wrong disk means formatting the wrong drive. - Type
cleanand press Enter to wipe the existing partition structure. - Type
create partition primaryand press Enter. - Type
select partition 1and press Enter. - Type
format fs=ntfs quick(swapntfsforfat32orexfatas needed, and dropquickfor a full format) and press Enter. - Type
assignto give the drive a letter so it shows up in File Explorer. - Type
exitto close DiskPart.
This same route is how you can format a drive to FAT32 past the 32GB limit that File Explorer enforces. The DiskPart format command doesn’t have that restriction, the way the GUI dialogue does.
A word of caution: the
cleanThe command is irreversible and wipes the entire disk’s partition table, not just one partition. Disconnect any other external drives before running these commands so you can’t accidentally select the wrong one.
Method 4: Free Third-Party Disk Formatting Tools (Best for Visual Partition Management)
Built-in tools cover most needs, but they fall short in a few specific spots: formatting to Linux file systems like Ext4, converting between file systems without erasing data, or managing multiple partitions visually instead of through a list.
That’s where third-party formatters earn their place.
Comparison: Best Disk Format Tools for Windows
| Tool | Best For | File Systems Supported | Free Version Limits | Price (Paid) |
|---|---|---|---|---|
| MiniTool Partition Wizard | Overall balance of features and ease of use | NTFS, FAT32, exFAT, Ext2/3/4 | Some advanced features (like OS migration) are Pro-only | Paid plans from ~$59 |
| EaseUS Partition Master | Beginners who want a guided, visual interface | NTFS, FAT32, exFAT, Ext2/3/4 | Some large-scale and advanced operations are gated behind Pro | Paid plans from ~$39.95/year |
| AOMEI Partition Assistant | Simple, no-frills formatting and partition resizing | NTFS, FAT32, exFAT, Ext2/3/4 | Server editions and some conversions require Pro | Paid plans from ~$49.95 |
| DiskGenius Free | Users who also want partition recovery tools bundled in | NTFS, FAT32, exFAT, Ext2/3/4 | Some recovery and advanced repair features are Pro-only | Paid plans from ~$69.95 |
| HP USB Disk Storage Format Tool | Quickly formatting USB flash drives specifically | FAT32, exFAT, NTFS | USB drives only; no internal disk support | Free |
| Rufus | Creating bootable USB installers (not general formatting) | FAT32, NTFS, exFAT + ISO writing | None; fully free and open source | Free |
| GParted | Advanced users needing Linux/Unix file systems, cross-platform use | Ext2/3/4, Btrfs, XFS, NTFS, FAT32, and more | None; free and open source | Free |
Most home users will be well served by MiniTool Partition Wizard or EaseUS Partition Master for everyday formatting and partition management, Rufus specifically when the goal is a bootable installer USB rather than a regular format, and GParted if you need Linux-native file systems that Windows tools don’t offer.
How to Format a Drive with AOMEI Partition Assistant (Step-by-Step Example)
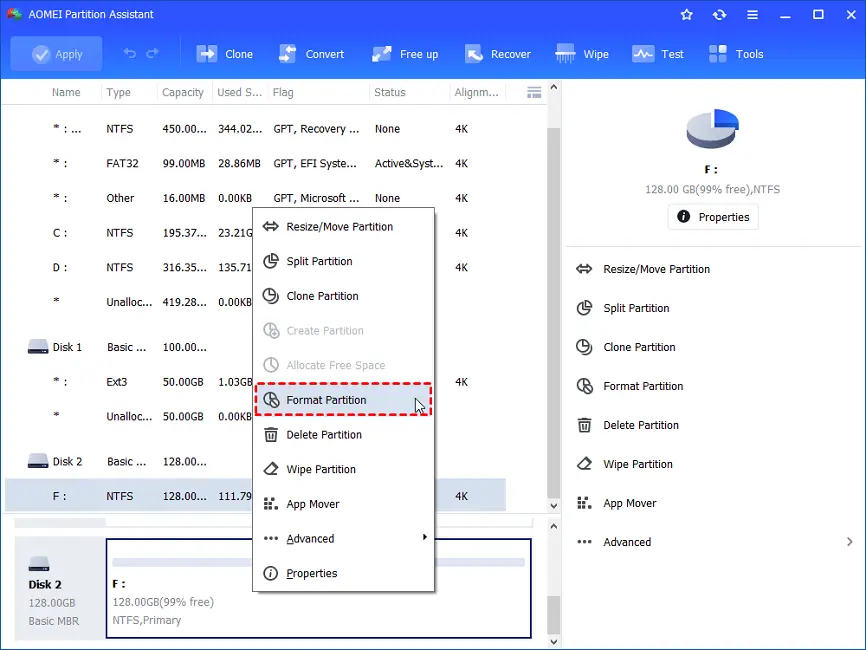
Since the interface pattern is nearly identical across most of these tools, here’s a walkthrough using AOMEI Partition Assistant as a representative example. The same basic flow applies to MiniTool and EaseUS as well.
- Download and install AOMEI Partition Assistant Standard (the free edition covers formatting for personal use).
- Open the program, right-click the partition or drive you want to format, and choose Format Partition.
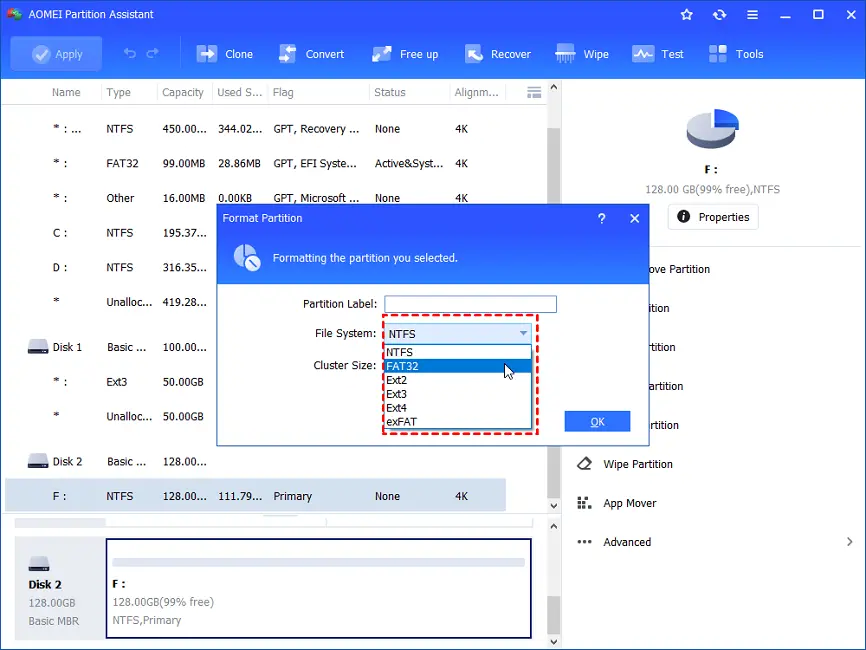
- Set the partition label, file system, and cluster size (allocation unit size) as needed, then click OK.
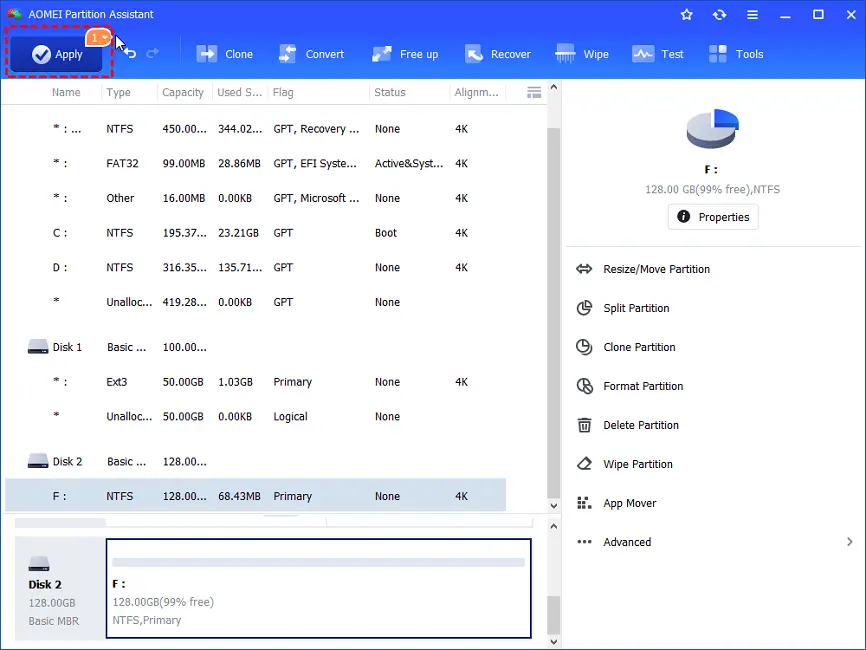
- Click Apply in the main interface to commit the change, then confirm.
This approach works even on drives that are write-protected or that File Explorer refuses to format directly, one of the main reasons people reach for third-party tools in the first place.
Formatting a RAW, Write-Protected, or “Windows Was Unable to Complete the Format” Drive
If your drive is refusing to format normally, it usually falls into one of these categories:
RAW drive (no recognised file system): Windows sees the drive but can’t identify a file system on it. It may often be caused by corruption, an interrupted format, or physical damage.
DiskPart’s clean and format sequence (Method 3 above) resolves this in most cases where the drive is otherwise healthy.
Write-protected drive: Some USB drives have a physical write-protect switch. Check for one first.
If there isn’t one, run DiskPart, select the drive, and type attributes disk clear readonly before attempting the format again.
“Windows was unable to complete the format”: This is often caused by a stubborn lock on the drive from another process, a failing drive, or a file system too large for the selected method.
Try DiskPart first; if that also fails, a third-party tool’s format function sometimes succeeds where the built-in ones don’t, since they use a different underlying process to write the file system.
If none of the above works, it’s worth running a quick health check with a tool like CrystalDiskInfo before continuing.
A drive that fails to format at all sometimes has a genuine hardware failure, and no formatting tool can fix that.
Accidentally Formatted a Drive? Here’s What to Do
This is one of the most common panic searches related to formatting, so it’s worth addressing directly: formatting does not necessarily destroy your data immediately.
A quick format clears the file system’s index, but the actual data often remains physically on the disk until new data overwrites it.
If you’ve just formatted a drive and need the data back:
- Stop using the drive immediately. Every write operation increases the chance of overwriting recoverable data.
- Use data recovery software on a different drive or PC to scan the formatted drive; tools like Recuva (free, for basic cases) or more advanced paid recovery software can often restore files after a quick format.
- A full format is much harder to recover from, since it overwrites more of the disk during the bad-sector scan; recovery chances drop significantly.
- If the data is critical and irreplaceable (business records, one-of-a-kind media), stop attempting DIY recovery and consult a professional data recovery service rather than risking further overwrites.
Related : RAM Generations ; DDR2, DDR3, DDR4, and DDR5 RAM?
Best Practices Before You Format Anything
A few habits go a long way toward avoiding an irreversible mistake:
- Back up first, always. Copy anything important to another drive, external storage, or cloud storage before formatting; there’s no undo button once it’s done.
- Double- and triple-check the drive letter or disk number. This is the single most common cause of accidental data loss during formatting, especially in DiskPart, where drives are identified only by number.
- Disconnect other external drives before formatting, so there’s no chance of selecting the wrong one.
- Choose Full Format for new or suspect drives, Quick Format for routine reformatting of a healthy drive.
- Pick the right file system for your actual use case; see the NTFS/FAT32/exFAT comparison above.
- Don’t interrupt the process. Closing the tool, unplugging the drive, or shutting down mid-format can corrupt the drive further and make it harder to recover from.
- Verify after formatting. Open the drive in File Explorer and confirm it shows the correct file system, label, and capacity before you start copying data back onto it.
- Use trusted software only. Stick to well-known tools (built-in Windows utilities, or the third-party options listed above). Unfamiliar “free formatter” downloads from unverified sites are a common source of bundled adware.
If your drive is failing to format because it’s simply worn out or nearing the end of its lifespan, this is often a good moment to replace it. A reliable external SSD [see the best options on Amazon] is faster and more durable than an ageing HDD for everyday backup and file transfer needs.
Related: How to Configure Windows Backup and Restore?
Common Mistakes to Avoid
- Formatting the wrong drive because disk numbers or letters weren’t double-checked, always confirm by size or label before proceeding.
- Choosing FAT32 for a large drive, then hitting the 4GB single-file size limit when trying to copy a large video file or backup archive.
- Assuming Quick Format is a secure wipe. If you’re selling or disposing of a drive with sensitive data, use a proper wipe/erase tool that overwrites the disk, not just a quick format.
- Skipping the backup step because “it’s just a quick format”. Quick formats still erase the accessible file index immediately.
- Interrupting a full format partway through, which can leave the drive in a worse state than before you started.
Conclusion
There isn’t a single “best” disk formatter for every situation; there’s a best tool for your situation. For a healthy drive and a standard file system, File Explorer gets the job done in seconds.
When a drive misbehaves, refuses to format, or needs FAT32 past the 32GB limit, DiskPart is the reliable fallback.
And when you want a visual, guided experience with extra partition management on top, a free tool like MiniTool Partition Wizard, EaseUS Partition Master, or AOMEI Partition Assistant covers nearly everything the built-in tools don’t.
Whichever route you take, the one step that matters more than the tool itself is backing up first. Formatting is fast, effective, and completely unforgiving of a wrong click.
Related: How to Fix the ” Windows could not automatically detect this network’s proxy settings ” Error?
Frequently Asked Questions
For most users, Windows’ built-in File Explorer or Disk Management is sufficient for standard formatting. If you need more flexibility, larger FAT32 drives, visual partition management, or Linux file systems, MiniTool Partition Wizard, EaseUS Partition Master, and AOMEI Partition Assistant are strong free third-party options.
No, standard formatting erases the drive’s file index and prepares it for new data. If you need to change the file system without data loss, some third-party tools (like AOMEI and MiniTool) offer a “convert file system” feature that preserves existing files. This is different from a standard format.
Windows’ built-in File Explorer and Disk Management tools intentionally cap FAT32 formatting at 32GB through the graphical interface. To format a larger drive to FAT32, use the DiskPart command line or a third-party tool that supports it.
NTFS is best for internal Windows drives and supports very large files and drives. FAT32 has broad compatibility with older and non-PC devices, but caps individual files at 4GB. exFAT combines large file support with strong cross-platform compatibility between Windows and Mac, making it ideal for external drives used across both.
Yes, for a healthy drive with no known issues, Quick Format is perfectly safe and much faster. Use Full Format instead if the drive has shown errors or you’re setting it up for the first time.
Often, yes, especially after a Quick Format, since the underlying data typically isn’t immediately overwritten. Stop using the drive right away and use data recovery software to attempt a scan before writing any new data to it.
Use DiskPart’s clean and format command sequence, or a third-party partition tool. RAW usually means the file system is corrupted rather than the drive itself being damaged, so formatting typically resolves it.
Built-in tools (File Explorer, Disk Management, DiskPart) handle the vast majority of formatting needs for free. Third-party tools become useful for large FAT32 drives, non-Windows file systems, visual partition resizing, or file system conversion without data loss.
The clean command wipes the partition table and all partition/volume information from the selected disk, effectively returning it to unallocated space. It is not reversible, so confirming the correct disk number beforehand is essential.
No, Windows blocks formatting of the drive it’s currently running from. To format the system drive, you need to boot from separate installation media (like a Windows installer USB) and format it from there.
exFAT is generally the best choice, since it’s natively readable and writable on both Windows and modern macOS without extra software, and doesn’t have FAT32’s 4GB file size limit.
A Quick Format usually takes seconds to a couple of minutes, regardless of drive size. A Full Format on a large drive (1TB or more) can take anywhere from 30 minutes to several hours, depending on drive speed and connection type.
Yes, in most cases. Try DiskPart’s attributes disk clear readonly command first; if the drive has a physical write-protect switch (common on some SD cards and USB drives), that needs to be switched off before formatting will work.
A standard format isn’t a secure wipe. The underlying data can potentially still be recovered. Use a dedicated disk-wiping tool that performs multiple overwrite passes, or a full format at minimum, for drives you’re disposing of or selling.
Formatting can resolve file system corruption and clear accumulated fragmentation, often restoring normal performance. However, if the slowness or corruption stems from physical drive failure, formatting won’t fix the underlying hardware issue.
Formatting itself doesn’t change physical capacity, but different file systems have different overhead, and manufacturers often list drives in decimal gigabytes while Windows reports binary gigabytes, which is why a “1TB” drive typically shows closer to 931GB in Windows, regardless of the file system used.
Standard formatting alone won’t make a USB drive bootable. For that, use a dedicated tool like Rufus, which formats the drive and writes the necessary boot files and ISO image in the correct structure.
This is often caused by a failing USB cable or port, insufficient power delivery (common with larger external HDDs on some USB ports), or a failing drive. Try a different cable and a direct USB port on your PC (avoiding hubs) before assuming the drive itself is bad.
For most general use, the default allocation unit size Windows suggests is fine. Smaller allocation units suit drives storing many small files efficiently, while larger units can improve performance for drives mainly storing large files like videos.
Yes, SD cards format the same way as any removable drive, through File Explorer, Disk Management, DiskPart, or third-party tools, though very old cameras or devices may still require FAT32 specifically for compatibility.
We hope you are interested in our articles and consider following our Facebook, Instagram, and Twitter pages for regular updates.
Also, share this article with your friends and relatives. Bookmark this page for future reference.
Subscribe to our free newsletter to get similar articles and regular updates directly in your Email Inbox.
Disclosure: We will receive an affiliate commission on some, but not all, of the products or services we recommend if you follow our links to a retailer’s website and make a purchase.
Subscribe to be the first to learn about new information