

How to Convert MTS Files to iMovie: 4 Working Methods
You’ve just pulled footage off your Sony or Panasonic camcorder, fired up iMovie to start editing, and… nothing. The import either fails outright, shows a greyed-out file, or imports but plays back choppy with no audio.
If you’re nodding along, you’re dealing with the classic MTS-to-iMovie compatibility problem, and you’re definitely not the only one.
The good news: this is a well-understood issue with several reliable fixes, ranging from completely free to a few minutes with paid software. Here’s what’s actually going on, and four ways to fix it depending on your situation.
Quick Answer:
Try the native import method first; connecting your camcorder (or its SD card) directly to iMovie via File > Import Media often works without any conversion at all, since iMovie does have built-in AVCHD support for many camera models. If that fails, or you’re working with MTS files already copied to your Mac, convert them to MP4 or MOV using a free tool like HandBrake, VLC, or a paid converter like WonderFox HD Video Converter Factory Pro, then import the converted file normally.
What Is an MTS File, and Why Does It Cause Problems?
MTS files are video clips recorded in the AVCHD (Advanced Video Coding High Definition) format, a standard jointly developed for HD camcorders, used heavily by Sony, Panasonic, Canon, and JVC cameras, and also used for storing HD video on Blu-ray discs.
The “MTS” extension specifically refers to an MPEG Transport Stream container.
iMovie officially supports AVCHD as one of its compatible formats, alongside MPEG-4, QuickTime Movie (MOV), MPEG-2, DV, and HDV. So in theory, MTS files should just work.
In practice, they often don’t, and there are a few real reasons why:
- File structure dependency. AVCHD footage isn’t just a loose MTS file; it’s part of a specific folder structure (a “package” containing BDMV and STREAM folders). If you’ve copied just the.MTS file out of that structure, iMovie may no longer recognise it properly.
- Unsupported frame rate or resolution combinations. iMovie does not reliably support certain high frame rate combinations, such as 720p at 60fps or 1080p at 50/60fps, depending on the iMovie version.
- Camera model recognition. iMovie’s native AVCHD import works through a recognised list of supported camcorders. If your specific model isn’t on that list, direct import may fail even though the file format itself is technically AVCHD-compliant.
- Codec variations between camera brands. Not every manufacturer implements AVCHD identically, which occasionally causes playback issues like audio drift or choppy frames even when the file imports.
The practical takeaway: MTS compatibility with iMovie is inconsistent enough that having a backup plan, converting to MP4 or MOV, is worth knowing, even if the native import works for you most of the time.
Related : Explained the Differences Between HD Ready, Full HD, and Ultra HD
Method 1: Try Native Import First (Free, No Conversion Needed)
This is the step most guides skip entirely, and it’s worth trying before reaching for any conversion software.
If your camcorder or its memory card is still available:
- Connect the camcorder directly to your Mac via USB, or insert the SD card into a card reader.
- Open iMovie and go to File > Import Media (or click the Import button in the toolbar).
- Select your camcorder or card from the device list on the left. iMovie will scan and display thumbnails of the available clips.
- Preview clips if needed, then select Import All, or hold Command to select specific clips before importing.
- Choose to import into an existing Event or create a new one, then confirm.
This native pathway works because iMovie is specifically designed to recognise and import directly from supported AVCHD camcorders, no format conversion required, no quality loss.
If the MTS files are already copied onto your Mac (not on the camera/card anymore):
AVCHD footage copied off a camera usually retains a folder structure that looks something like a folder named “PRIVATE” or “AVCHD,” containing a BDMV folder, which contains a STREAM folder, and that STREAM folder is where the actual.MTS clips live.
- Locate the top-level AVCHD folder in Finder.
- Right-click it and choose Show Package Contents if it appears as a single package icon, or navigate normally if it’s a regular folder.
- Drill down to BDMV > STREAM.
- You’ll see the individual.MTS clips here, often named with numbers like 00000.MTS.
- Try dragging these directly into iMovie’s Import window or media library.
This sometimes succeeds even when importing a standalone, relocated MTS file fails, because iMovie can still recognise the surrounding AVCHD package structure.
If neither of these works for your specific footage, move on to conversion.
Method 2: Convert with HandBrake (Free, Open-Source)
HandBrake is a free, actively maintained, open-source video converter that handles MTS/AVCHD input reliably and is one of the most trusted tools in this space, with no bundled extras, no nags to upgrade.
- Download and install HandBrake from its official website (search “HandBrake”; it’s free and available for both Mac and Windows).
- Open HandBrake and click Open Source, then select your MTS file (or the STREAM folder containing your clips).
- Under the Summary tab, set the output format to MP4.
- Under the Video tab, you can leave the default encoder (H.264) unless you have a specific reason to change it; the defaults work well for iMovie compatibility.
- Choose a destination file name and folder at the bottom of the window.
- Click Start to begin the conversion.
- Once finished, open iMovie, go to File > Import Media, and select the converted MP4 file.
HandBrake does re-encode the video rather than simply repackaging it, which means conversion takes a bit longer than a straight remux, but quality loss is minimal at default or higher quality settings.
Method 3: Convert with VLC Media Player (Free, Fast for Simple Remuxing)
VLC’s conversion feature is a lesser-known but genuinely useful option, especially when you just need to repackage the MTS file into an MP4 or MOV container without changing the actual video encoding, which is faster and avoids any re-encoding quality loss.
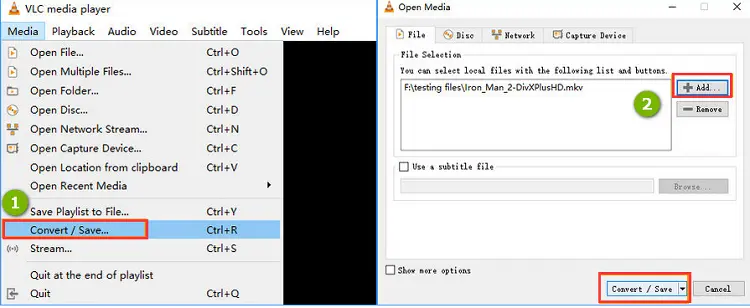
- Open VLC Media Player (download it from VLC’s official website if you don’t already have it).
- Click Media in the top menu, then select Convert/Save…
- Click Add…, locate your MTS file, and select it.
- Click Convert/Save to open the conversion settings window.
- Next to Profile, use the dropdown to select an MP4 or MOV profile.
- If you only want to repackage the file without re-encoding (fastest option, no quality loss), click the wrench/edit icon next to the profile, go to the Encapsulation tab, choose MP4 or MOV, and ensure the video and audio codec settings match the original where possible.
- Click Browse to choose your destination folder and file name.
- Click Start to begin the conversion.
- Import the resulting file into iMovie as usual.
VLC’s conversion tool is genuinely powerful but has a less intuitive interface than dedicated converters. If you find yourself fighting with codec settings, HandBrake, or a dedicated paid tool will get you there with less friction.
Method 4: Convert with WonderFox HD Video Converter Factory Pro (Paid, Fastest with GPU Acceleration)
If you’re converting a large batch of MTS clips regularly, say, from a wedding shoot or a vacation with hours of camcorder footage, a dedicated paid converter can save real time thanks to GPU-accelerated processing.
- Download and install WonderFox HD Video Converter Factory Pro.
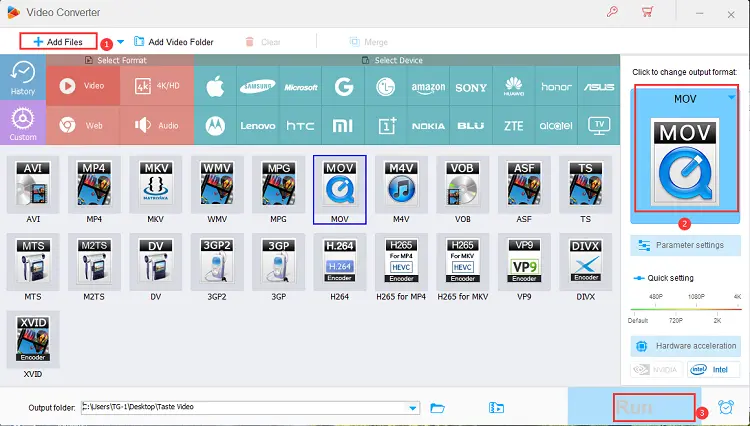
- Launch the program and click the centre + button (or drag and drop) to load your MTS file(s). Batch loading multiple clips at once is supported.
- Click Output Formats, go to the Video category, and select an iMovie-compatible format such as MP4 or MOV.
- Optionally, click Preferences to adjust resolution, encoder, or audio settings; the defaults are generally fine for straightforward iMovie import.
- Set your output folder using the small triangle/folder icon at the bottom of the window.
- Click Run to start the conversion.
- Once complete, import the converted file into iMovie via File > Import Media.
Beyond conversion, this software also includes basic editing tools, trimming, cropping, watermarks, and noise removal. So, for very simple edits, you could technically skip iMovie altogether and finish the job inside the converter itself.
Comparing Your Options
| Method | Cost | Speed | Quality | Best For |
|---|---|---|---|---|
| Native import (camera/card) | Free | Instant, no conversion | No loss , original quality | Footage still on the camera or SD card |
| Native import (AVCHD folder via Finder) | Free | Instant, no conversion | No loss | MTS files already copied, folder structure intact |
| HandBrake | Free | Moderate (re-encodes) | Excellent at default+ settings | Most users need a reliable free converter |
| VLC (remux only) | Free | Very fast (no re-encoding) | No loss if remuxing only | Quick fixes when you just need a container change |
| WonderFox HD Video Converter Factory Pro | Paid | Fast (GPU-accelerated) | Excellent, configurable | Large batches, regular conversion needs |
Related : What Is the Difference Between MP3 and MP4?
Common Mistakes to Avoid
- Deleting the original AVCHD folder structure before trying native import. If you’ve already copied just the loose.MTS files and lost the BDMV/STREAM folders, native import becomes much less reliable. Always keep the original folder structure as a backup until you’re sure the footage has been imported correctly.
- Re-encoding when a simple remux would do. If your only issue is the file container (not the actual video/audio codec), a quality-preserving remux via VLC is faster and avoids unnecessary recompression.
- Ignoring frame rate mismatches. If your camcorder recorded in 1080p at 50fps or 60fps, double-check your iMovie version’s supported frame rates before assuming the conversion itself is broken.
- Converting at unnecessarily high bitrates. Matching or slightly exceeding your original file’s bitrate is enough. Going far higher just creates bigger files without any visible quality benefit.
- Skipping a test import. Always convert and import one clip first to confirm everything plays back correctly, audio sync, frame rate, colour, before batch-converting hours of footage.
Troubleshooting: Imported But Something’s Wrong
Audio is out of sync after import: This usually points to a frame rate mismatch introduced during conversion. Re-convert using a setting that matches your original footage’s exact frame rate rather than a generic preset.
Video imports but plays back choppy: This can happen on older Macs without sufficient hardware decoding support for the specific codec variant your camera used. Re-encoding to a more standard H.264 MP4 via HandBrake usually resolves this.
No audio at all after conversion: Double-check that your converter’s audio codec setting wasn’t accidentally set to “none” or muted. This is an easy setting to miss, particularly in VLC’s more technical conversion interface.
iMovie shows the file, but the thumbnail is black or won’t preview: Try re-importing after a fresh restart of iMovie, or convert the file again using a different output format (try MOV if you originally used MP4, or vice versa). This occasionally resolves stubborn thumbnail-generation glitches.
Final Thoughts
MTS files and iMovie have had a rocky relationship for years, mostly because AVCHD as a format was never designed with simple drag-and-drop editing in mind. It was built for camcorders and Blu-ray storage efficiency, not desktop editing software.
The good news is that once you understand why the friction happens, fixing it is usually quick: try native import first since it costs you nothing and preserves full quality, and keep HandBrake or VLC bookmarked as a free fallback for the times it doesn’t cooperate.
If you’re editing footage regularly from the same camcorder, it’s worth testing your exact model’s import behaviour once and noting what works; that one-time check saves you from re-diagnosing the same problem on every future editing session.
Related : Which is the Best Disk Formatter for Windows?
Frequently Asked Questions
iMovie officially supports AVCHD, but compatibility issues can arise from frame rate mismatches, camera models not on iMovie’s recognised list, or MTS files being separated from their original AVCHD folder structure.
Yes, iMovie lists AVCHD among its supported formats, alongside MPEG-4, MOV, MPEG-2, DV, and HDV, though real-world compatibility varies by camera model and specific recording settings.
Connect your camcorder or its memory card directly to your Mac and use iMovie’s File > Import Media option. This often works without any conversion needed at all.
Both work well with iMovie. MP4 is more universally compatible across other software too, while MOV is Apple’s native format and sometimes integrates slightly more smoothly within Apple’s own editing tools.
If you re-encode (using tools like HandBrake or WonderFox), there’s a small, usually unnoticeable quality loss unless you use low-quality settings. If you remux instead (using VLC’s container-only conversion), there’s no quality loss at all.
Yes, both HandBrake and VLC Media Player are completely free and handle MTS-to-iMovie-compatible conversions reliably.
This is usually a converter setting issue. Check that your audio codec selection wasn’t set to “none” during conversion, which is an easy setting to overlook, particularly in VLC.
It’s the internal folder structure that AVCHD footage uses to organise individual MTS clips. Keeping this structure intact (rather than extracting loose MTS files) often makes direct import into iMovie more reliable.
If iMovie’s native import recognises your camcorder, yes, no conversion is needed in that case. If native import fails, conversion to MP4 or MOV becomes necessary.
varies by iMovie version and specific frame rate/resolution combination. Some higher frame rate combinations, like 1080p at 50 or 60fps, have had inconsistent support across iMovie versions.
Remuxing changes only the file container (e.g., from MTS to MOV) without touching the actual video/audio data, making it fast and lossless. Re-encoding fully recompresses the video, which takes longer but can fix deeper compatibility issues that remuxing can’t.
QuickTime can sometimes play MTS files directly, but it isn’t a reliable conversion tool for this format. A dedicated converter like HandBrake or VLC is a better choice for getting iMovie-compatible output.
If you’re converting MTS files occasionally, free tools like HandBrake or VLC are sufficient. If you regularly process large batches of camcorder footage, the GPU-accelerated speed of a paid converter can genuinely save significant time.
Skip straight to conversion using HandBrake, VLC, or a paid converter rather than troubleshooting native import further, since unsupported camera models typically won’t import directly regardless of settings.
Yes, HandBrake, VLC, and WonderFox all support adding and converting multiple files in a single batch, which is far more efficient than converting clips one at a time for larger projects.
Yes, M2TS is essentially the same AVCHD-based format with a different file extension, and the same import and conversion methods described here apply equally to M2TS files.
Yes, all the methods and tools covered here work normally on current Apple Silicon Macs. Older compatibility concerns tied to outdated Intel or PowerPC-based Macs are no longer relevant on any Mac sold in recent years.
Found this useful? Follow us on Facebook, Instagram, and Twitter for more practical tech guides, or subscribe to our newsletter for updates straight to your inbox.
Also, share this article with your friends and relatives. Bookmark this page for future reference.
Disclosure: We will receive an affiliate commission on some, but not all, of the products or services we recommend if you follow our links to a retailer’s website and make a purchase.
Subscribe to be the first to learn about new information