
How to Configure BSNL FTTH Modem for Internet and Voice?
Configuring a BSNL FTTH (Fibre to the Home) modem, or ONT, entails configuring the device for internet access.
We cannot give detailed step-by-step instructions for all versions of BSNL FTTH modems since they use different ONT models.
We’re utilising Netlink ONT in this example, so we can provide you with a generic step-by-step setup procedure for this model.
The interface and settings may differ based on the ONT type offered by BSNL, but the configuration method is nearly identical.
As previously stated, let us look at the complete step-by-step modem configuration method of Netlink WiFi ONT / ONU (Optical Network Unit) to allow internet and phone services.
This ONU/ONT is linked to a Netlink GPON BSNL OLT (Optical Line Terminal), which provides upstream and downstream data speeds at the same level as the BSNL broadband plan you have selected.
Note: The ONT is set up for you when you obtain your BSNL FTTH connection; therefore, there is no need to modify any settings. Most customers simply need to alter the Wi-Fi SSD name and password. BSNL personnel will additionally configure this during installation. However, you are only permitted to use this setup instruction for informational and educational purposes.
Before you begin configuring the system, make sure you have the necessary information on hand:
- Your broadband Username and Password are provided by BSNL.
- VLAN values from the service provider or BSNL.
- Also, note that the connection Type is PPPoE (mostly common for FTTH).
Here’s a general outline of the steps to configure a BSNL FTTH modem:
Physical Connections:
Connect one end of the fibre cable to the BSNL Optical Network Terminal (ONT).
Connect your PC or laptop to the ONT by Ethernet wire or to the modem’s Wi-Fi network.
Use the default Wi-Fi password provided at the bottom of the ONT if the WiFi settings have not been altered.
Accessing the Modem Interface:
On your connected device, launch your favourite web browser.
Enter the modem’s default gateway IP address in the address bar.
The Netlink ONT’s default gateway address is 192.168.1.1. To enter the modem’s login page, press Enter.
Log in to ONT Settings:
Enter the default username and password for the modem.
The default credentials are usually listed on the back of the modem or given by BSNL.
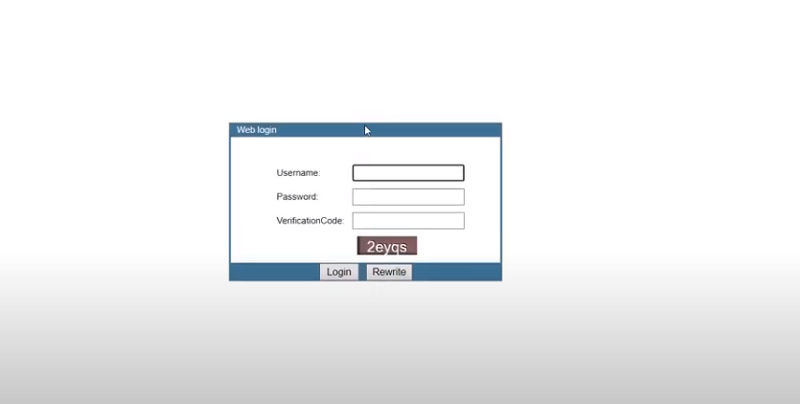
For Netlink ONT, the username is ‘admin’, and the password is ‘stdONU101’.
When you log in for the first time, you will be allowed to change the default password, which you should do for your network security.
Configure Internet/WAN Settings:
After logging in, you will get the ONT configuration interface.
Go to the Network tab on the top menu and select Internet connection on the left pane.
Then you will get the screen for WAN Configuration.
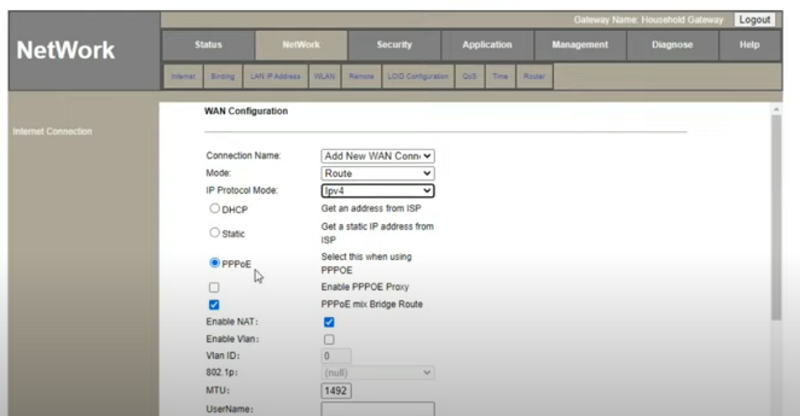
You can delete any default WAN configuration settings by selecting that one.
Add a New WAN Connection from the drop-down menu.
Then enter/select the following values.
Mode: Route
IP protocol mode: IPv4
Check the radio button => PPPPoE
Enable NAT: Tick yes
Enable VLAN: Tick yes
VLAN ID: Enter the value you got from BSNL.
802.11p: null
MTU: 1460 or 1492 ( Normally, it will be auto-filled.Contact BSNL if you have any problems.MTU means the maximum transmission unit, which is the size of the largest protocol data unit that can be communicated in a single network layer transaction.
Enter the FTTH broadband user name and Password you got from BSNL
Normal Username: If your BSNL account is registered as Rajesh, then the password starts with the first two letters, i.e., ra + your std code (3-digit STD code) + 7-digit telephone [email protected]
Example: [email protected]
However, in some areas, BSNL assigns a random username based on your landline number.
Normal Password: password (it is the default one)
Service Name: BSNL or add what you want.
PPP type: AUTOCONNECT
Service mode: INTERNET
Click on Save/Apply
Here, your internet configuration settings will be saved, and the ONT will be rebooted.
Here, you will start seeing the PON (passive optical network port) light turned on to green in the router if the internet connection is active.
Also, you can verify the status of the Internet on the Status tab on the top menu.
Test Connectivity:
After the ONT has rebooted, try to connect to the Internet using your connected device (through Ethernet or Wi-Fi).
If you have any problems throughout the configuration process or are unclear about any specific settings, contact BSNL customer care or your local service provider for assistance.
They can offer you precise information and walk you through the setup process based on your modem model.
Voice Configuration:
As in the previous Internet configuration, for the BSNL voice configuration, go to the Network tab on the top menu and select Internet connection from the left pane.
You will get the same WAN Configuration settings.
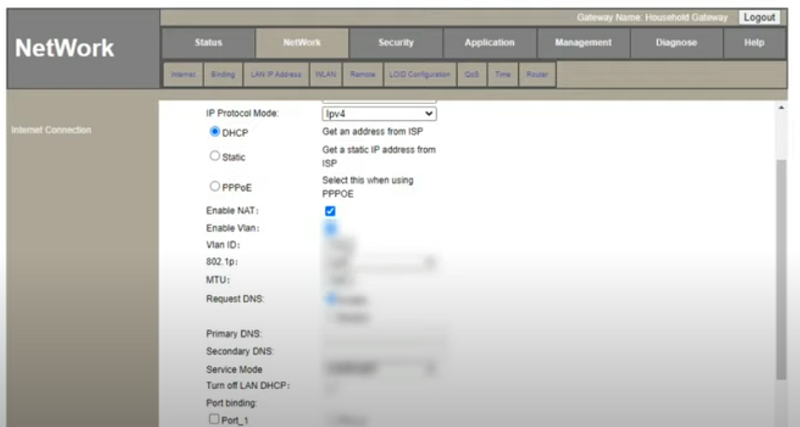
Connection Name: Add new WAN connection
Mode: Route
IP Protocol Mode: IPv4
DHCP Get an address from ISP => Select this
Enable NAT: Tick yes
Enable VLAN: Tick yes
VLAN ID: Get from BSNL
802.1p: Try this with null first, if at the end you won’t get any result, enter number 7 and try
MTU: 1500
Request DNS: Enable
Primary DNS: No need to enter anything
Secondary DNS: No need to enter anything
Service Mode VOICE
Turn off LAN DHCP: leave as it is unchecked
Port binding: leave it as it is, unchecked
Port_1 WLAN(SSID1) leave as it is, unchecked
Port_2 leave as it is, unchecked
Click on the Save/Apply button
Click on the Application tab in the top menu
Enable the SIP in the radio button in the Menu. If not
Outgoing Calls may not be possible.
Now, under the Applications tab=> select the VOIP tab
Voice Interface: Always select Service Mode as VOICE, 802.1p as 7, and IP
Mask Gateway as given by BSNL.
Enter the Telephone Number in settings.
VOICE Server Settings (Get from BSNL) in the VOIP Menu, Select Server Type as Softswitch SIP.
To check if VOICE is working in Status > VOIP Information, it will be registered.
Check the Internet status and the WAN Connection Info status. Both should be operational (UP), and the default gateway should be displayed if the settings are correct.
Then Click Apply /SAVE
Configure Wireless Settings:
You can set up your wireless network by going to the Wireless or Wi-Fi settings section of the ONT.
Here you can set your desired Wi-Fi network name (SSID) and password.
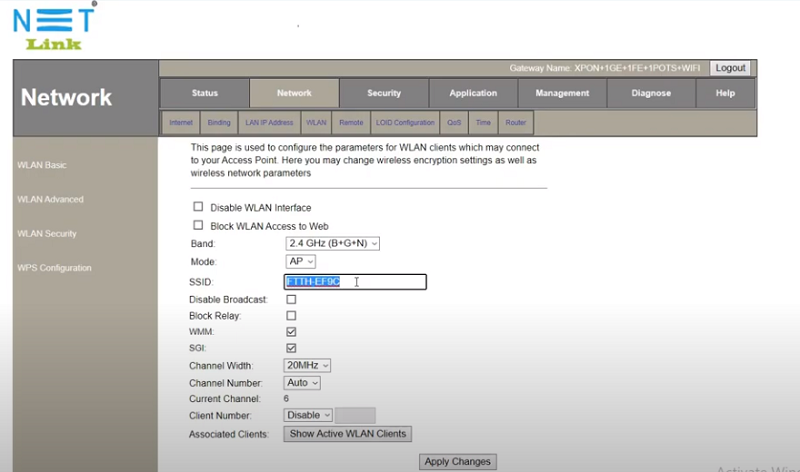
Go to the Network tab
Select WLAN under it.
Here you will get the option to change your SSID as you want.
To change the WiFi password, select the WLAN Security option on the left pane.
Here you can change the Pre-Shared Key option to set the desired password.
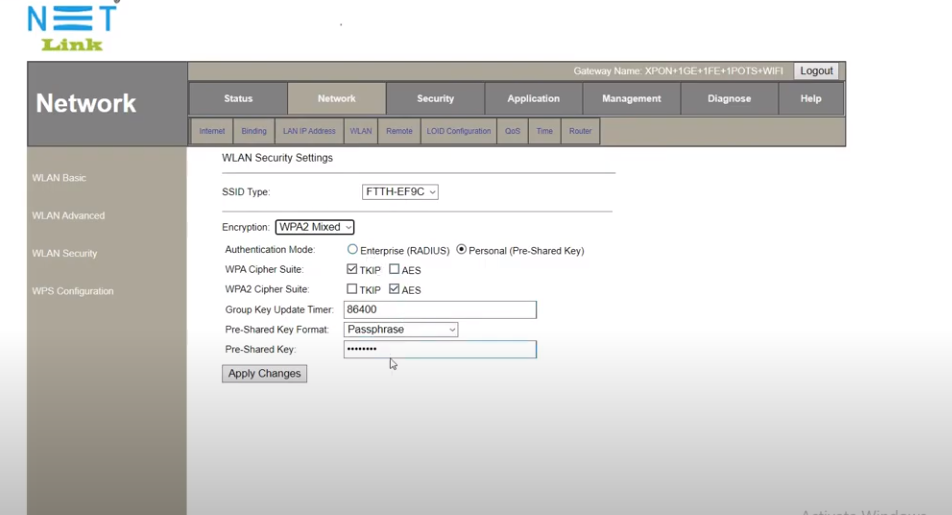
Then click on Apply/Save
We hope that this tutorial on BSNL modem configuration has provided you with the fundamental knowledge required to configure the BSNL ONT in your FTTH connection.
If you have any questions about the setup settings, please contact BSNL or your service provider. You can share your problems on this page too.
We hope you are interested in this tutorial and consider following our Facebook, Instagram, and Twitter pages for regular updates.
Subscribe to our free newsletter to get similar articles and regular updates directly in your Email Inbox.
Also, share this article with your friends and relatives. Bookmark this page for future reference.
Subscribe to be the first to learn about new information